
- 분류 전체보기 (859)

| 일 | 월 | 화 | 수 | 목 | 금 | 토 |
|---|---|---|---|---|---|---|
| 1 | 2 | 3 | 4 | 5 | ||
| 6 | 7 | 8 | 9 | 10 | 11 | 12 |
| 13 | 14 | 15 | 16 | 17 | 18 | 19 |
| 20 | 21 | 22 | 23 | 24 | 25 | 26 |
| 27 | 28 | 29 | 30 |
- Elasticsearch
- PETERICA
- 정보처리기사실기 기출문제
- CKA 기출문제
- Pinpoint
- golang
- kotlin
- AI
- minikube
- AWS EKS
- tucker의 go 언어 프로그래밍
- 티스토리챌린지
- 코틀린 코루틴의 정석
- APM
- Linux
- CKA
- kotlin querydsl
- Java
- kotlin coroutine
- mysql 튜닝
- docker
- 공부
- 오블완
- 정보처리기사 실기 기출문제
- CloudWatch
- Spring
- Kubernetes
- 기록으로 실력을 쌓자
- aws
- go
- Today
- Total
피터의 개발이야기
[Kubernetes] 클러스터 설치방법 with Play with Kubernetes 본문

[kubernetes] 쿠버네티스 목차
ㅁ 개요
이 글은 쿠버네티스 입문, 동양북스 책을 보고 공부한 내용을 정리하였다.
웹을 통해 쿠버네티스 설치 과정을 공부할 수 있는 사이트를 소개하고 그 과정을 정리하였다.
ㅁ 웹 브라우저에서 사용할 수 있는 사이트
1. 카타코다 쿠버네티스 플레이그라운드
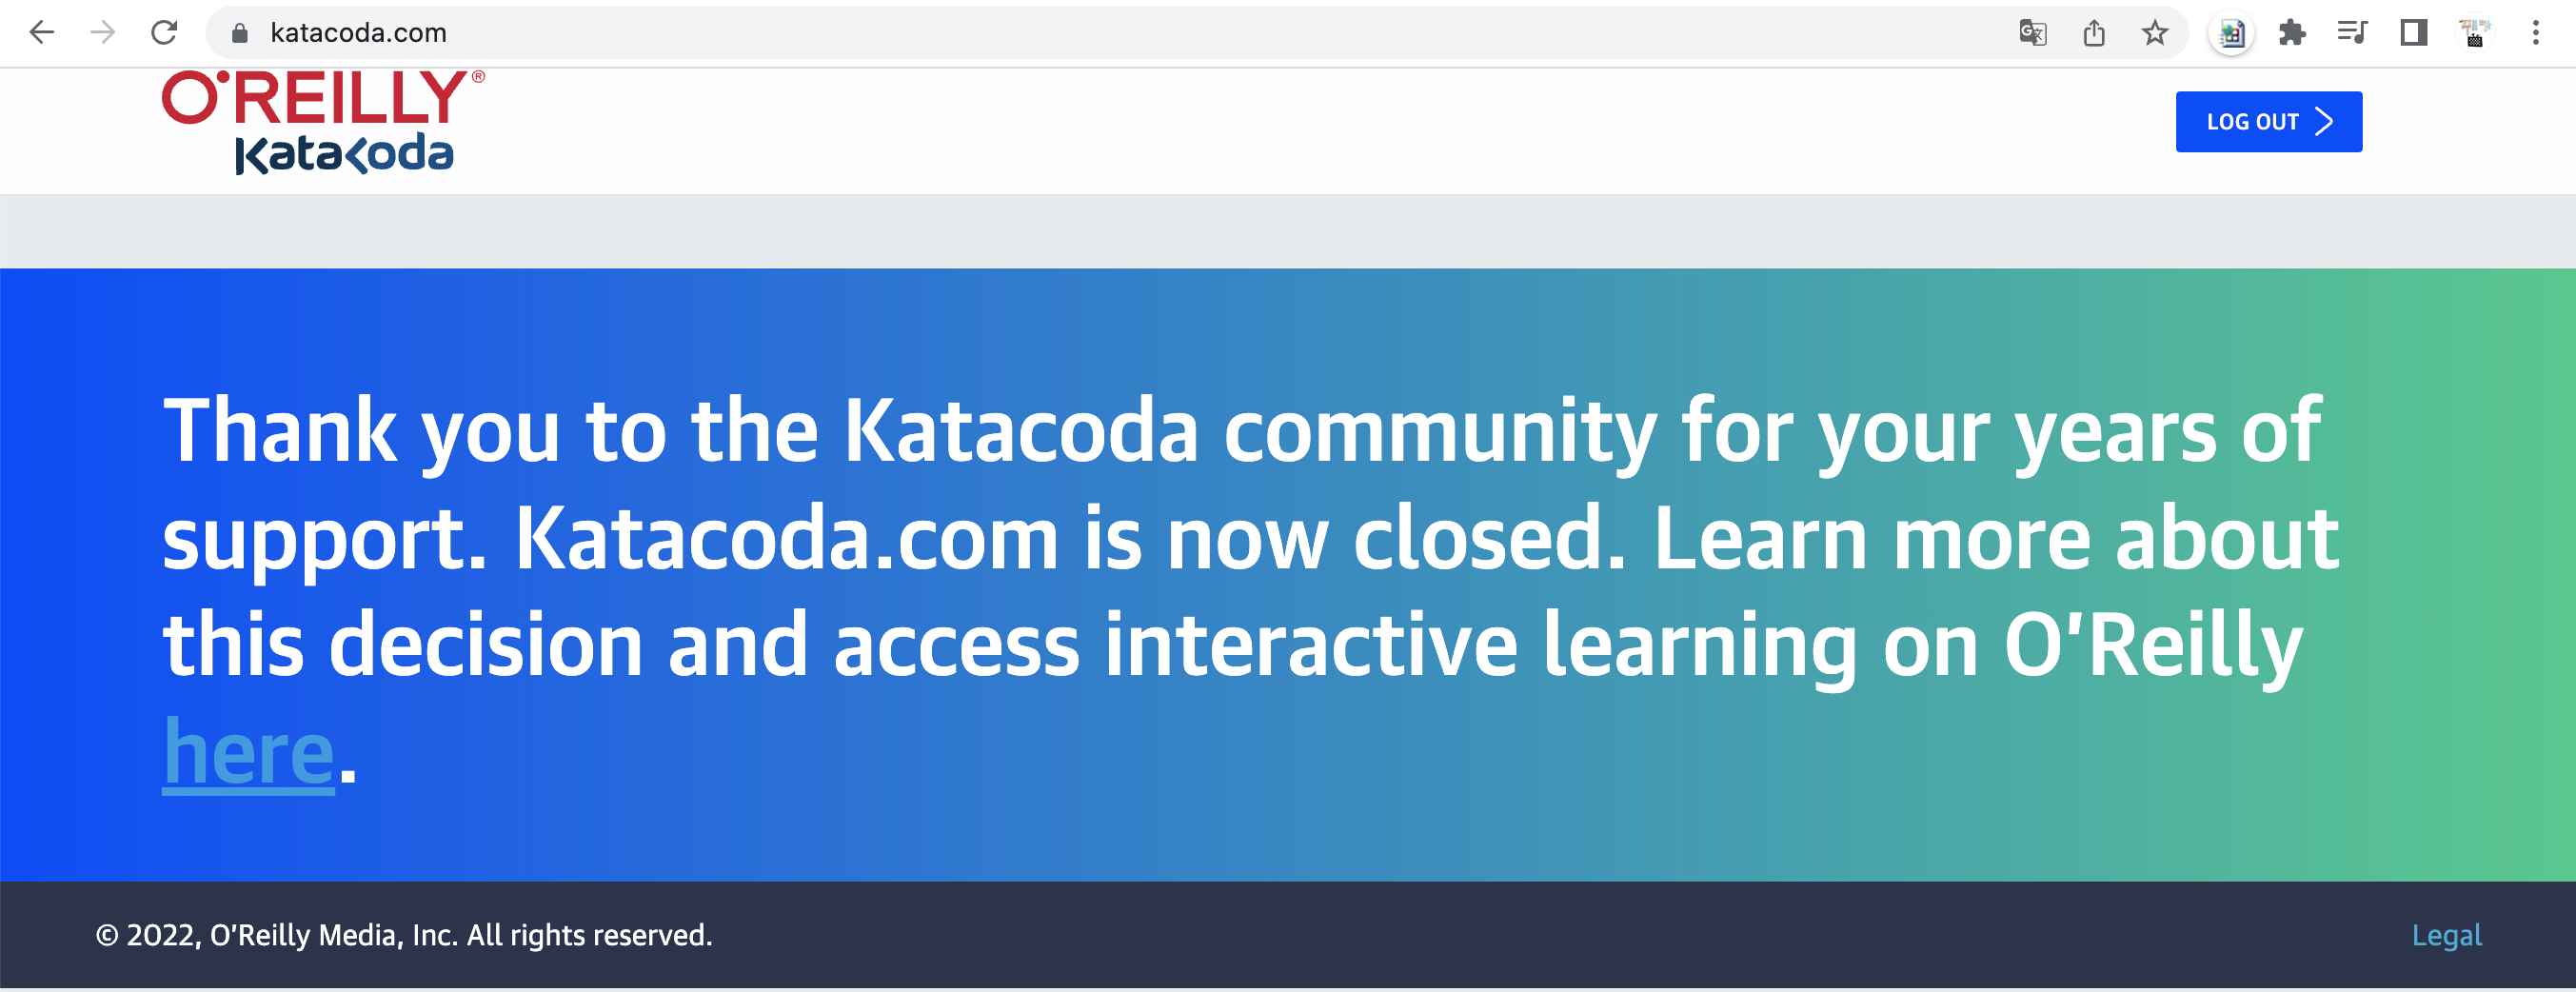
O'Reilly는 2019년 말에 Katacoda를 인수하였다. 그 결과 katacoda.com을 더 이상 공용으로 사용할 수 없으며 2022년 6월 15일에 사이트를 폐쇄되었다. 책에서는 소개해 주고 있지만 현재는 사용할 수 없게 되었다. 페이지 이동
2. Play with Kubernetes
ㅇ Play with Kubernetes는 Docker에서 제공 하고 Tutorius에서 만든 랩 사이트이다. Play with Kubernetes는 사용자가 몇 초 만에 K8 클러스터를 실행할 수 있는 플레이그라운드이다. 브라우저에서 무료 Alpine Linux 가상 머신을 사용하는 경험을 제공한다. DinD(Docker-in-Docker)는 여러 VM/PC의 효과를 제공하는 데 사용된다. Kubernetes에 대해 자세히 알아보려면 통합된 Play with Kubernetes 명령줄을 사용하여 보다 직접적인 학습을 제공 하는 Play with Kubernetes Classroom을 제공하고 있다.
ㅁ Play with Kubernetes에서 쿠버네티스 설치 해보기
1. 계정 연결과정
ㅇ 웹 페이지로 이동한다.

ㅇ 로그인을 클릭하고 gitHub, docker 계정으로 로그인을 한다.
ㅇ 로그인이 성공하면 Login 버튼이 Start로 변경 되어 있으며, 클릭한다.
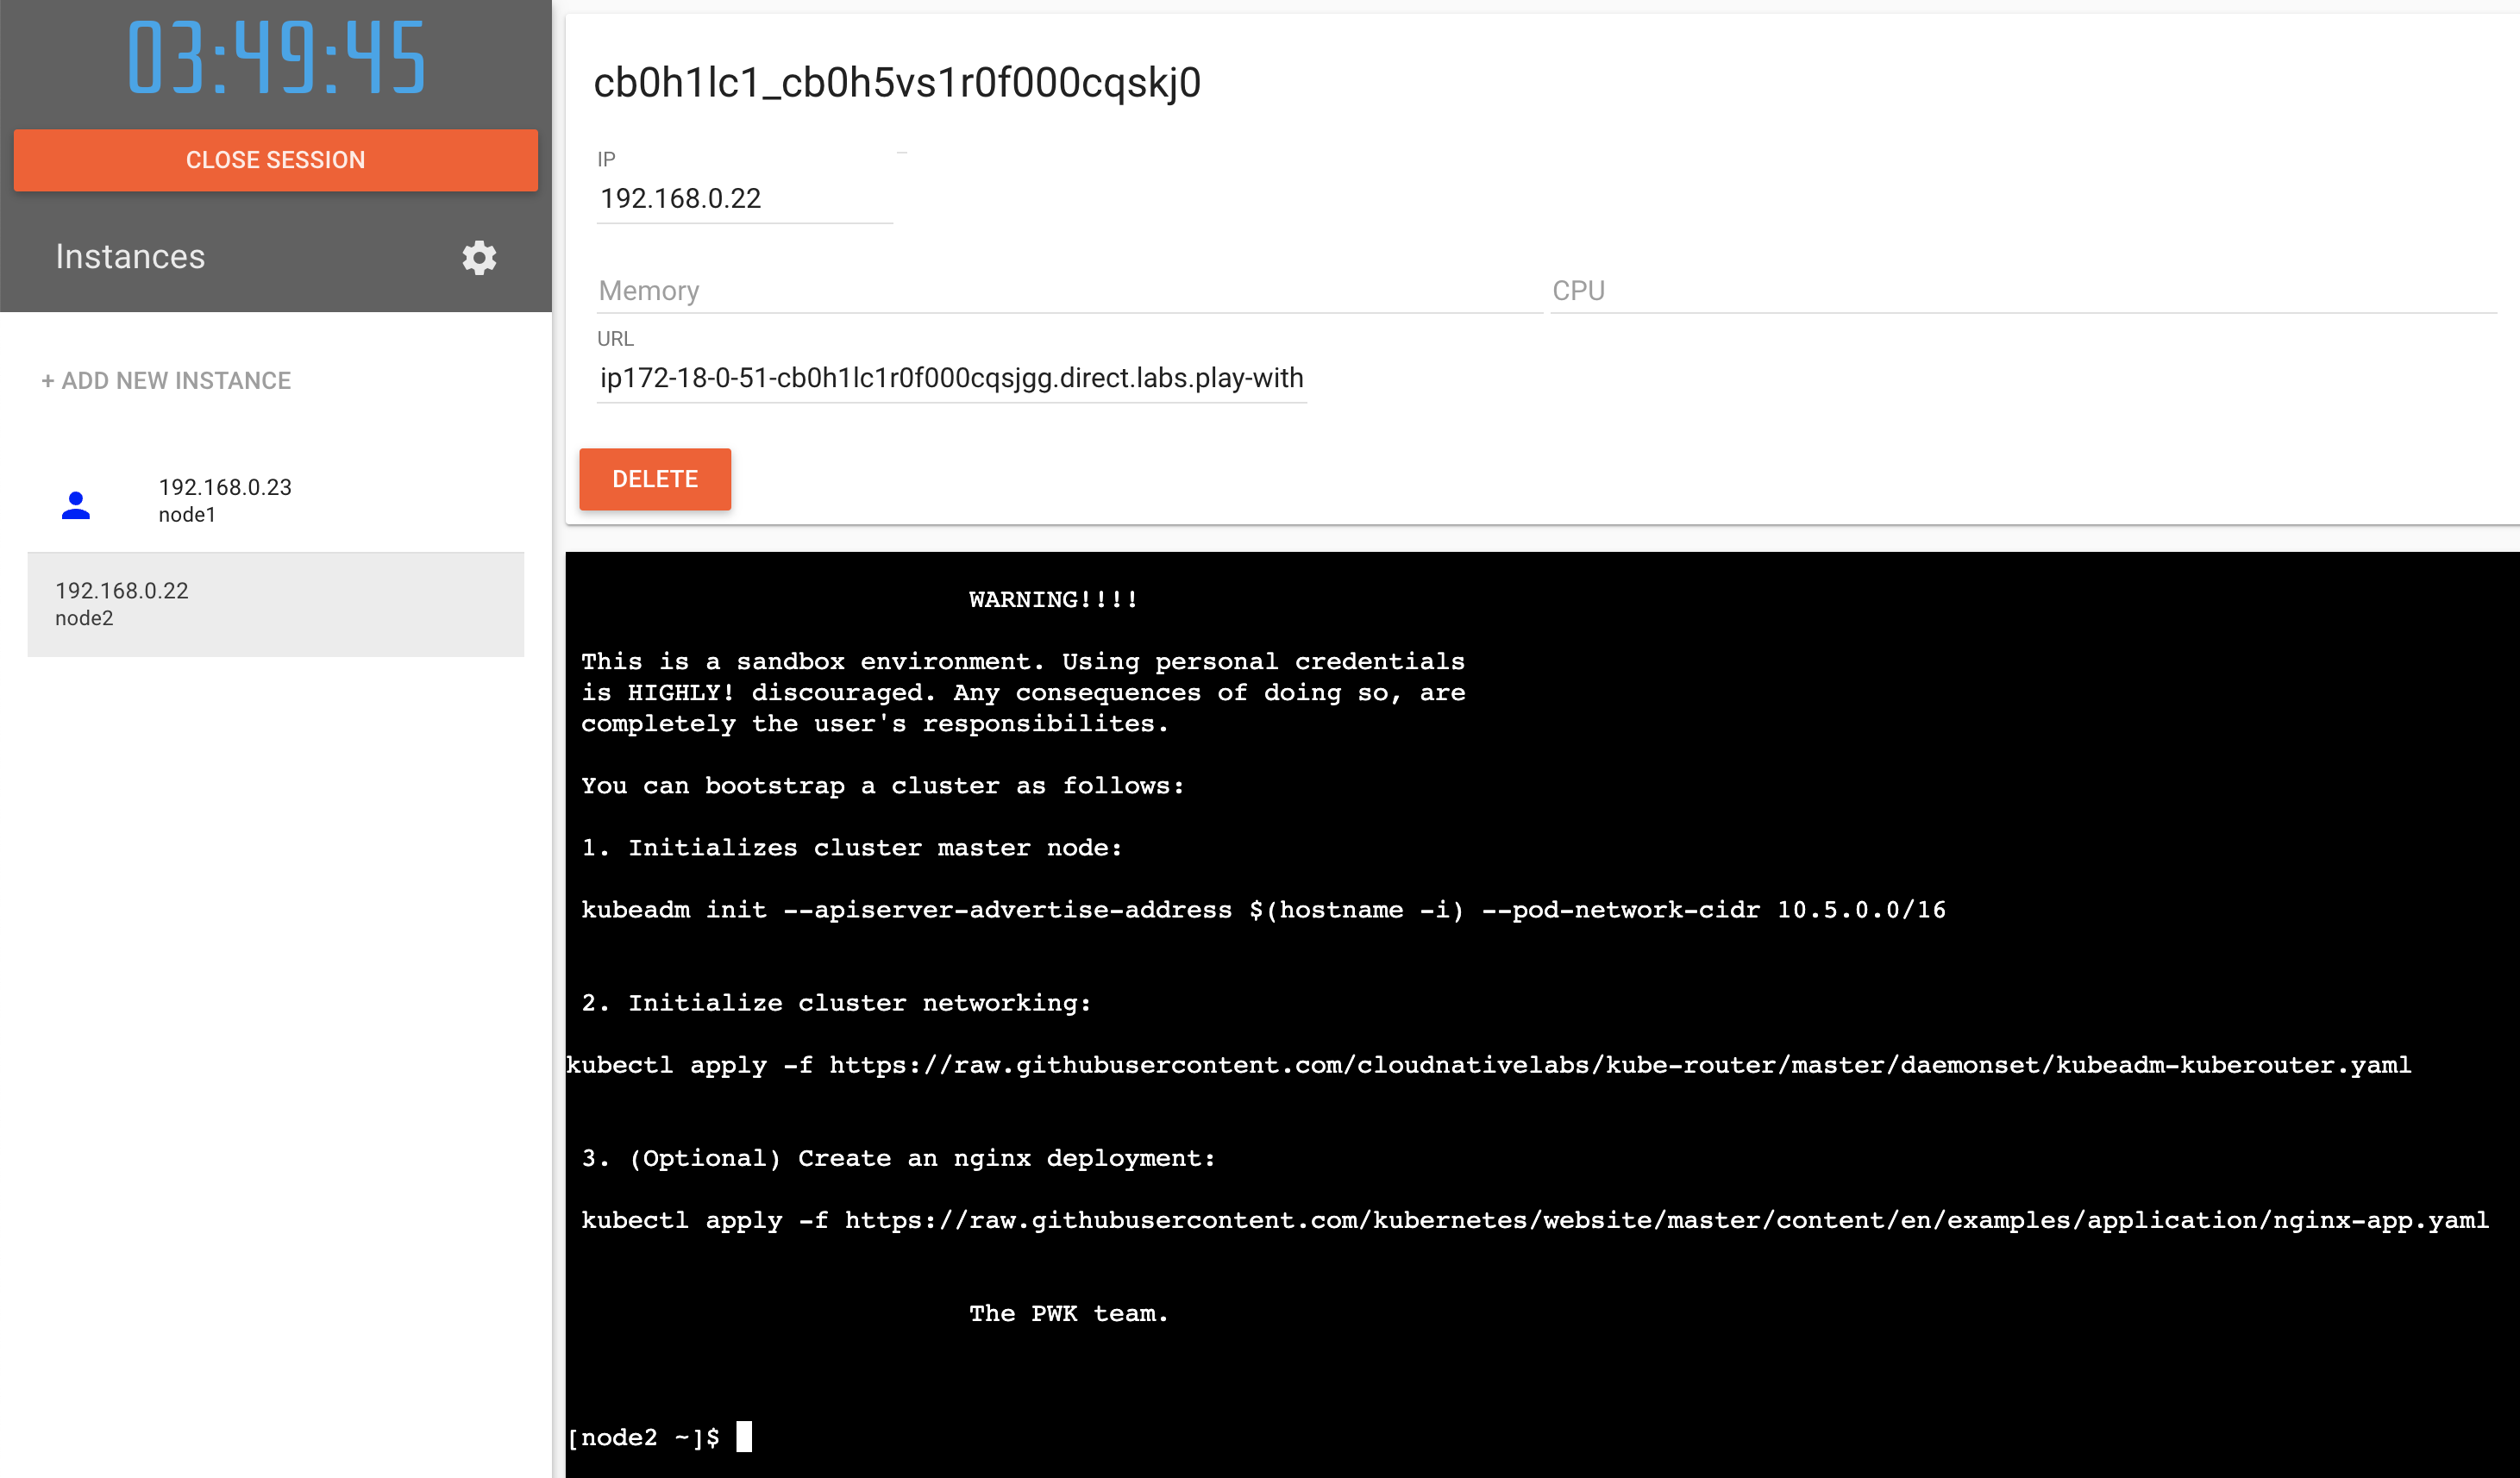
2. 인스턴스 생성페이지

ㅇ 4시간 동안 직접 노드를 추가할 수 있다. 자동으로 클러스터를 구성해 주지 않고 직접 구성할 수 있도록 유도하여 클러스터 구성을 연습할 수 있다.
ㅇ 왼쪽에 + ADD NEW INSTANCE를 클릭한다.
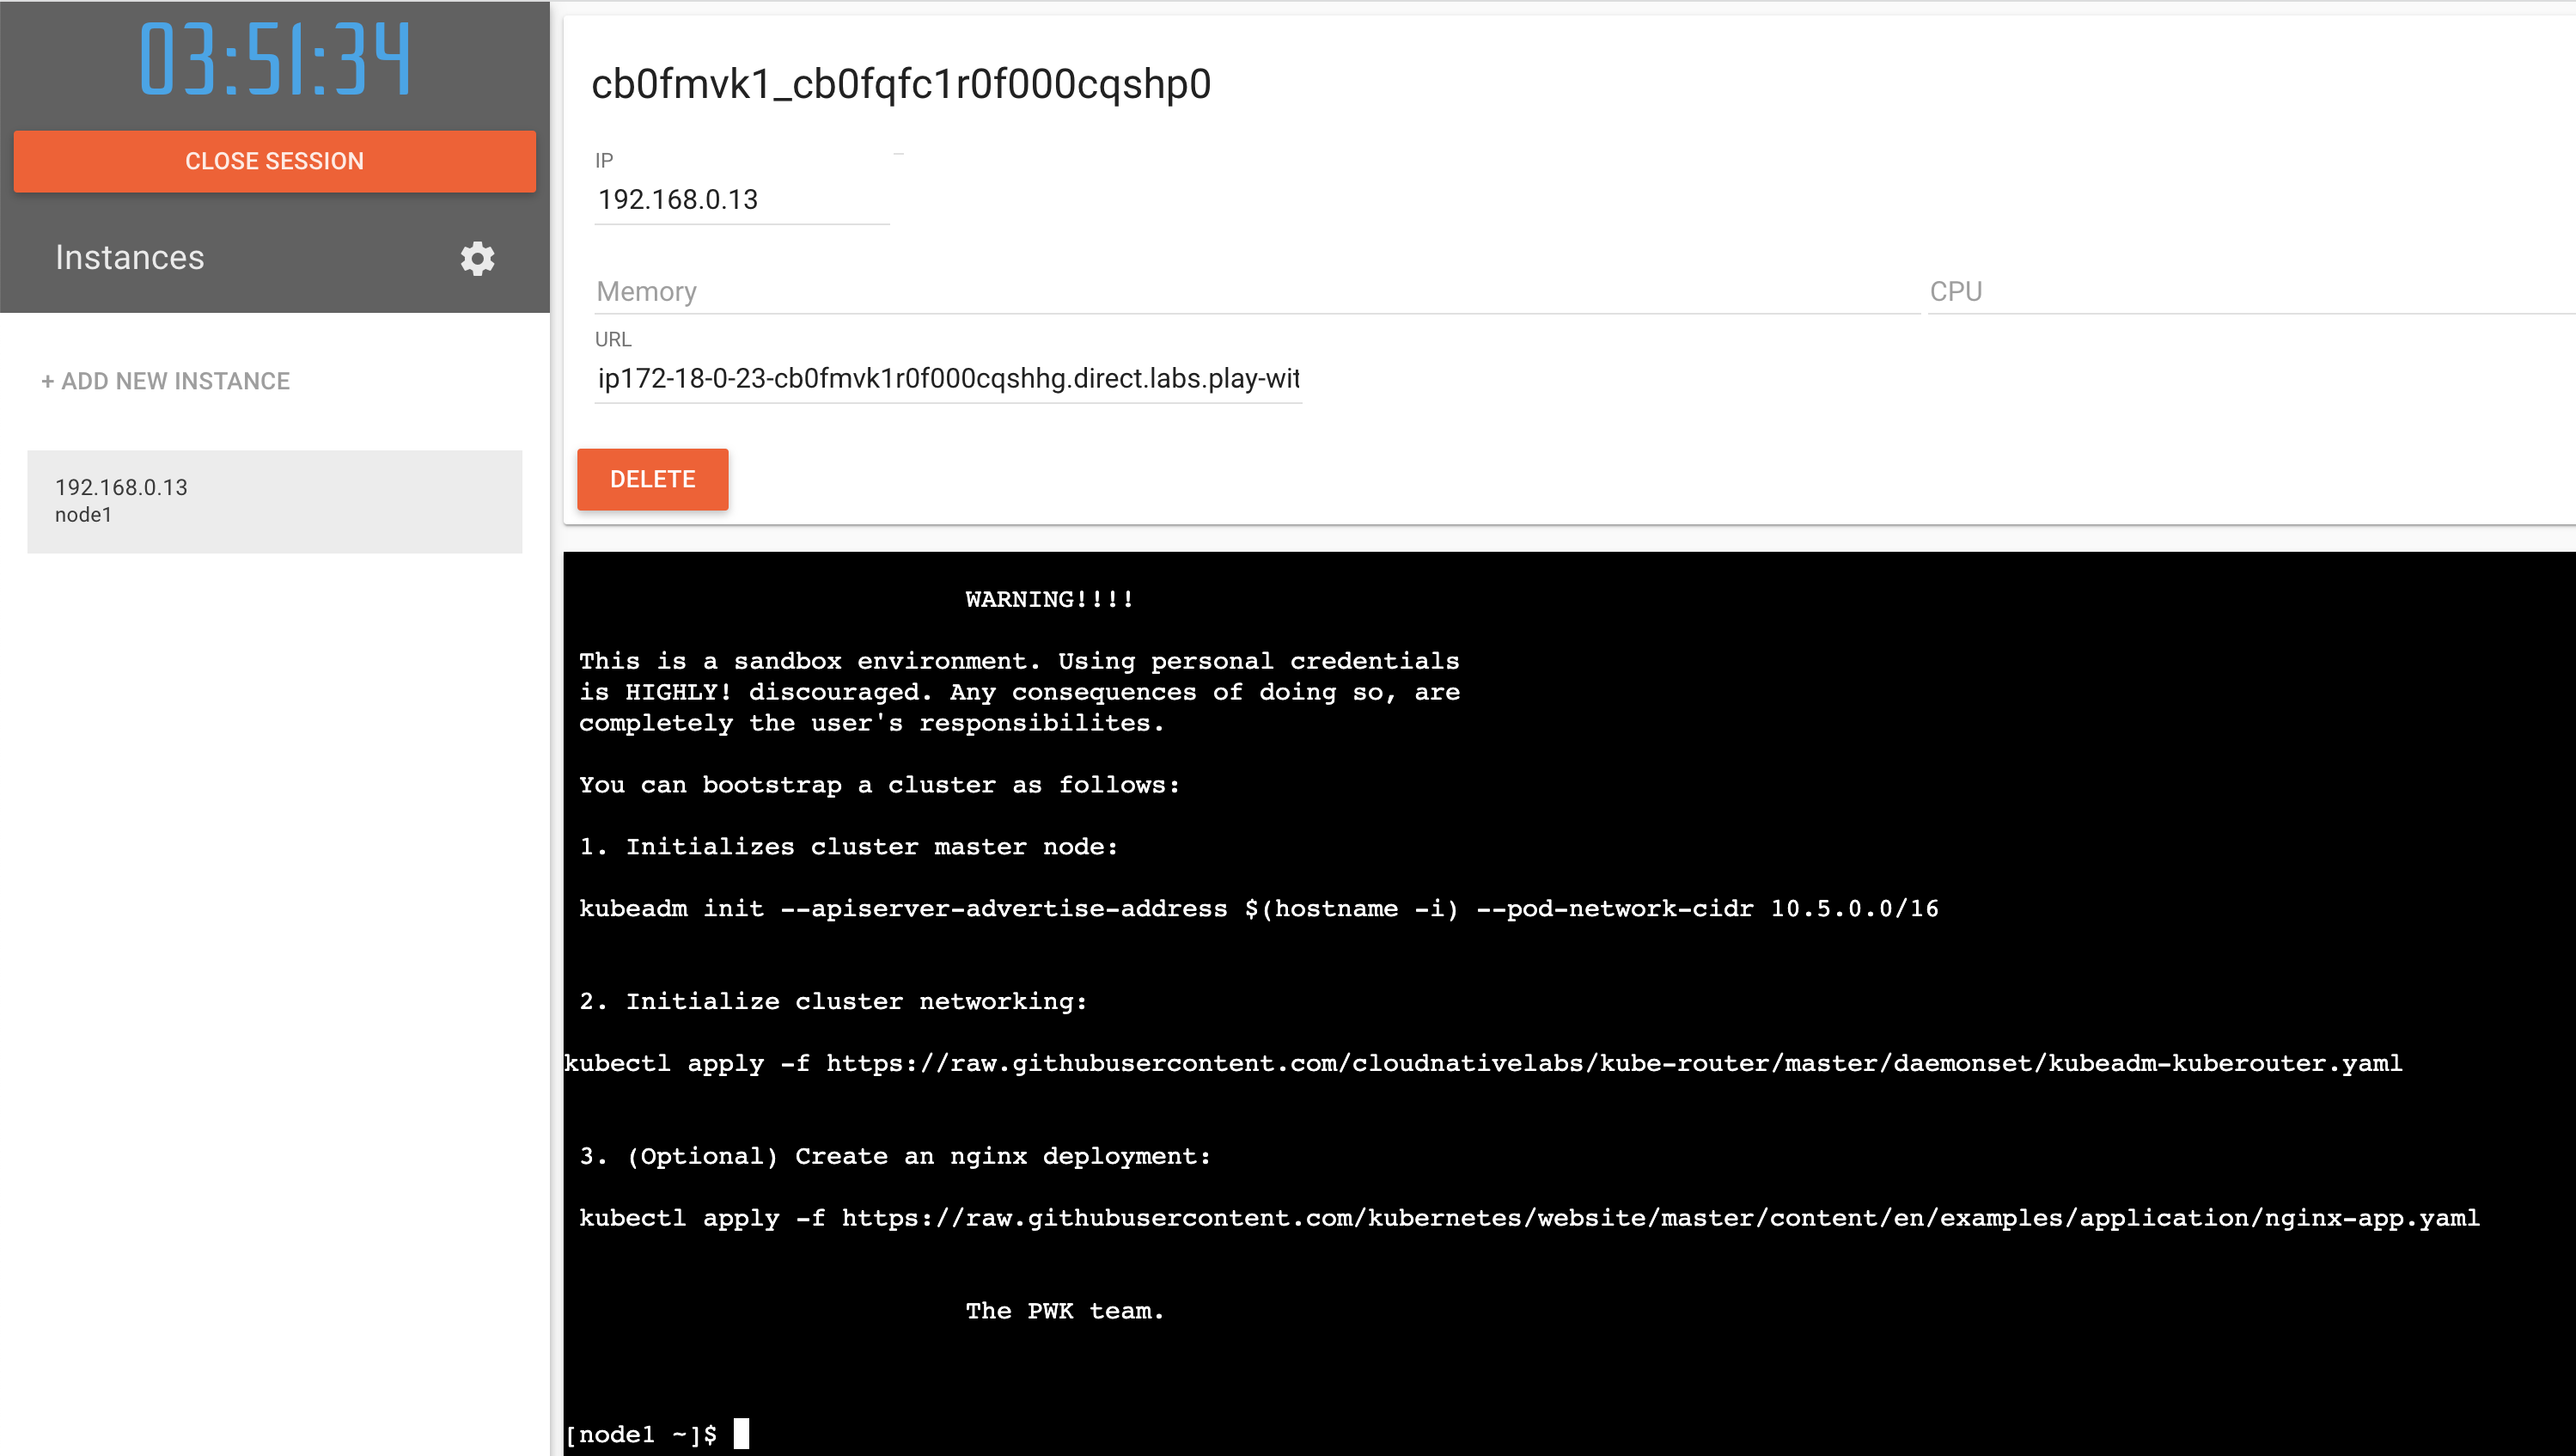
                          WARNING!!!!

 This is a sandbox environment. Using personal credentials
 is HIGHLY! discouraged. Any consequences of doing so, are
 completely the user's responsibilites.

 You can bootstrap a cluster as follows:

 1. Initializes cluster master node:

 kubeadm init --apiserver-advertise-address $(hostname -i) --pod-network-cidr 10.5.0.0/16


 2. Initialize cluster networking:

kubectl apply -f https://raw.githubusercontent.com/cloudnativelabs/kube-router/master/daemonset/kubeadm-kuberouter.yaml


 3. (Optional) Create an nginx deployment:

 kubectl apply -f https://raw.githubusercontent.com/kubernetes/website/master/content/en/examples/application/nginx-app.yaml


                          The PWK team.
ㅇ 인스턴스가 생성되었다.
ㅇ Master와 Networking 설정과정을 안내하고 있다. 순서대로 따라해 보았다.
3. Master Cluster 설치
1) kubeadm init
kubeadm init --apiserver-advertise-address $(hostname -i) --pod-network-cidr 10.5.0.0/16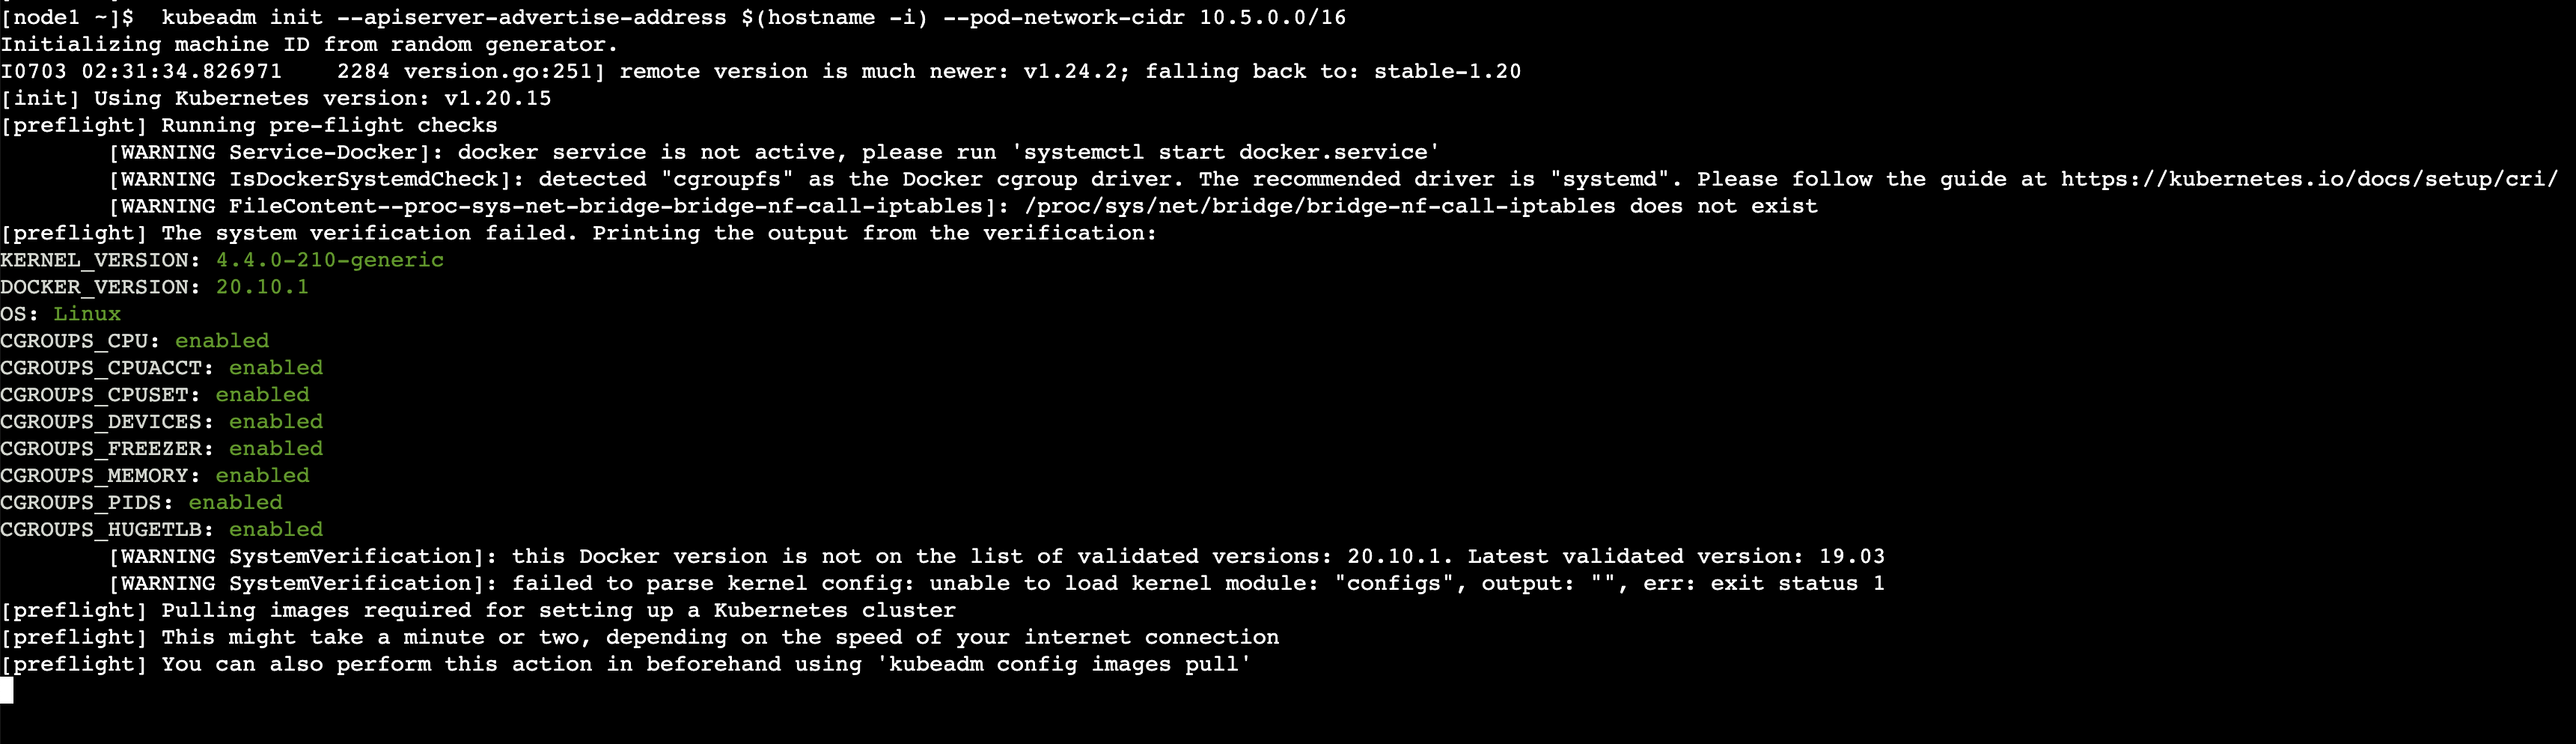
ㅇ kubeadm 을 통해 init을 하고 있다.
ㅇ 설치가 진행되었다.
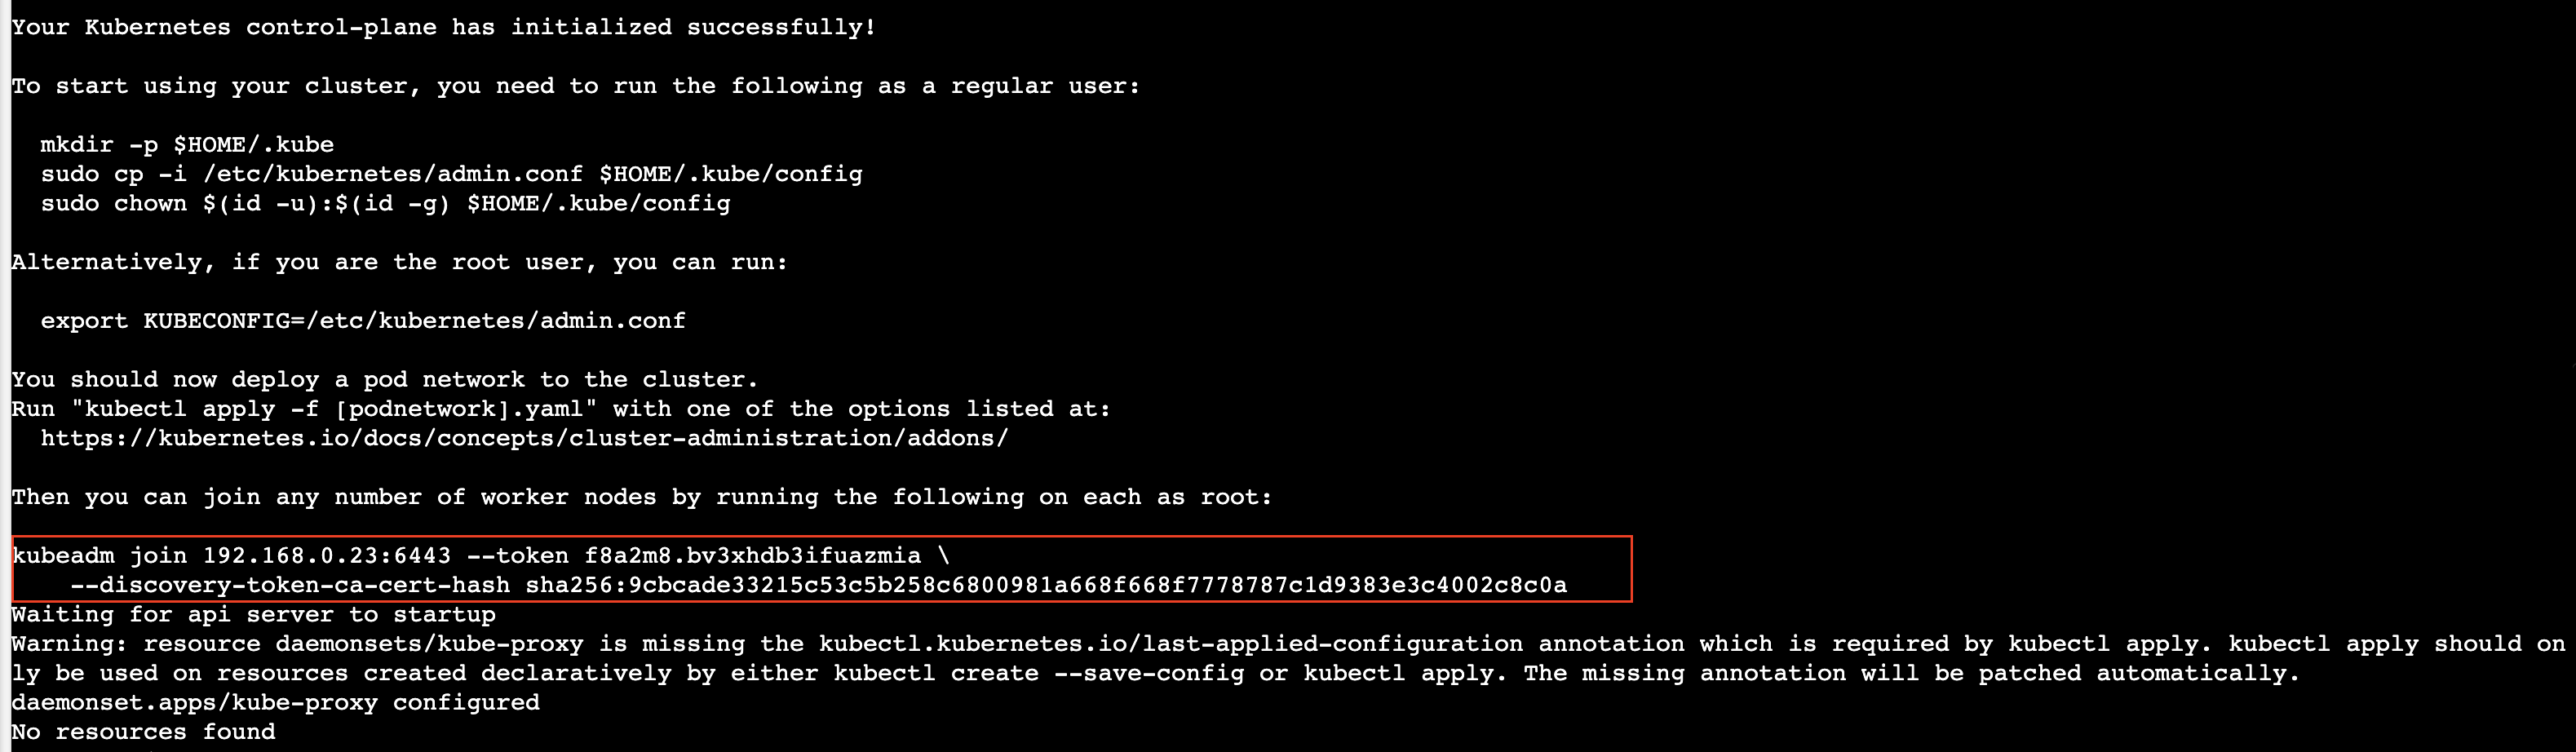
ㅇ 설치가 성공적으로 완료되었다.
ㅇ 워크노드를 연결하기 위한 URL 정보를 확인할 수 있다. 나중을 위해 따로 저장해 둔다.
Then you can join any number of worker nodes by running the following on each as root:

kubeadm join 192.168.0.23:6443 --token f8a2m8.bv3xhdb3ifuazmia \
--discovery-token-ca-cert-hash sha256:9cbcade33215c53c5b258c6800981a668f668f7778787c1d9383e3c4002c8c0a[node1 ~]$ kubeadm init --apiserver-advertise-address $(hostname -i) --pod-network-cidr 10.5.0.0/16
Initializing machine ID from random generator.
I0703 03:46:35.963328 331 version.go:251] remote version is much newer: v1.24.2; falling back to: stable-1.20
[init] Using Kubernetes version: v1.20.15
[preflight] Running pre-flight checks
[WARNING Service-Docker]: docker service is not active, please run 'systemctl start docker.service'
[WARNING IsDockerSystemdCheck]: detected "cgroupfs" as the Docker cgroup driver. The recommended driver is "systemd". Please follow the guide at https://kubernetes.io/docs/setup/cri/
[WARNING FileContent--proc-sys-net-bridge-bridge-nf-call-iptables]: /proc/sys/net/bridge/bridge-nf-call-iptables does not exist
[WARNING Swap]: running with swap on is not supported. Please disable swap
[preflight] The system verification failed. Printing the output from the verification:
KERNEL_VERSION: 4.4.0-210-generic
DOCKER_VERSION: 20.10.1
OS: Linux
CGROUPS_CPU: enabled
CGROUPS_CPUACCT: enabled
CGROUPS_CPUSET: enabled
CGROUPS_DEVICES: enabled
CGROUPS_FREEZER: enabled
CGROUPS_MEMORY: enabled
CGROUPS_PIDS: enabled
CGROUPS_HUGETLB: enabled
[WARNING SystemVerification]: this Docker version is not on the list of validated versions: 20.10.1. Latest validated version: 19.03
[WARNING SystemVerification]: failed to parse kernel config: unable to load kernel module: "configs", output: "", err: exit status 1
[preflight] Pulling images required for setting up a Kubernetes cluster
[preflight] This might take a minute or two, depending on the speed of your internet connection
[preflight] You can also perform this action in beforehand using 'kubeadm config images pull'
[certs] Using certificateDir folder "/etc/kubernetes/pki"
[certs] Generating "ca" certificate and key
[certs] Generating "apiserver" certificate and key
[certs] apiserver serving cert is signed for DNS names [kubernetes kubernetes.default kubernetes.default.svc kubernetes.default.svc.cluster.local node1] and IPs [10.96.0.1 192.168.0.23]
[certs] Generating "apiserver-kubelet-client" certificate and key
[certs] Generating "front-proxy-ca" certificate and key
[certs] Generating "front-proxy-client" certificate and key
[certs] Generating "etcd/ca" certificate and key
[certs] Generating "etcd/server" certificate and key
[certs] etcd/server serving cert is signed for DNS names [localhost node1] and IPs [192.168.0.23 127.0.0.1 ::1]
[certs] Generating "etcd/peer" certificate and key
[certs] etcd/peer serving cert is signed for DNS names [localhost node1] and IPs [192.168.0.23 127.0.0.1 ::1]
[certs] Generating "etcd/healthcheck-client" certificate and key
[certs] Generating "apiserver-etcd-client" certificate and key
[certs] Generating "sa" key and public key
[kubeconfig] Using kubeconfig folder "/etc/kubernetes"
[kubeconfig] Writing "admin.conf" kubeconfig file
[kubeconfig] Writing "kubelet.conf" kubeconfig file
[kubeconfig] Writing "controller-manager.conf" kubeconfig file
[kubeconfig] Writing "scheduler.conf" kubeconfig file
[kubelet-start] Writing kubelet environment file with flags to file "/var/lib/kubelet/kubeadm-flags.env"
[kubelet-start] Writing kubelet configuration to file "/var/lib/kubelet/config.yaml"
[kubelet-start] Starting the kubelet
[control-plane] Using manifest folder "/etc/kubernetes/manifests"
[control-plane] Creating static Pod manifest for "kube-apiserver"
[control-plane] Creating static Pod manifest for "kube-controller-manager"
[control-plane] Creating static Pod manifest for "kube-scheduler"
[etcd] Creating static Pod manifest for local etcd in "/etc/kubernetes/manifests"
[wait-control-plane] Waiting for the kubelet to boot up the control plane as static Pods from directory "/etc/kubernetes/manifests". This can take up to 4m0s
[apiclient] All control plane components are healthy after 12.006044 seconds
[upload-config] Storing the configuration used in ConfigMap "kubeadm-config" in the "kube-system" Namespace
[kubelet] Creating a ConfigMap "kubelet-config-1.20" in namespace kube-system with the configuration for the kubelets in the cluster
[upload-certs] Skipping phase. Please see --upload-certs
[mark-control-plane] Marking the node node1 as control-plane by adding the labels "node-role.kubernetes.io/master=''" and "node-role.kubernetes.io/control-plane='' (deprecated)"
[mark-control-plane] Marking the node node1 as control-plane by adding the taints [node-role.kubernetes.io/master:NoSchedule]
[bootstrap-token] Using token: f8a2m8.bv3xhdb3ifuazmia
[bootstrap-token] Configuring bootstrap tokens, cluster-info ConfigMap, RBAC Roles
[bootstrap-token] configured RBAC rules to allow Node Bootstrap tokens to get nodes
[bootstrap-token] configured RBAC rules to allow Node Bootstrap tokens to post CSRs in order for nodes to get long term certificate credentials
[bootstrap-token] configured RBAC rules to allow the csrapprover controller automatically approve CSRs from a Node Bootstrap Token
[bootstrap-token] configured RBAC rules to allow certificate rotation for all node client certificates in the cluster
[bootstrap-token] Creating the "cluster-info" ConfigMap in the "kube-public" namespace
[addons] Applied essential addon: CoreDNS
[addons] Applied essential addon: kube-proxy
Your Kubernetes control-plane has initialized successfully!
To start using your cluster, you need to run the following as a regular user:
mkdir -p $HOME/.kube
sudo cp -i /etc/kubernetes/admin.conf $HOME/.kube/config
sudo chown $(id -u):$(id -g) $HOME/.kube/config
Alternatively, if you are the root user, you can run:
export KUBECONFIG=/etc/kubernetes/admin.conf
You should now deploy a pod network to the cluster.
Run "kubectl apply -f [podnetwork].yaml" with one of the options listed at:
https://kubernetes.io/docs/concepts/cluster-administration/addons/
Then you can join any number of worker nodes by running the following on each as root:
kubeadm join 192.168.0.23:6443 --token f8a2m8.bv3xhdb3ifuazmia \
    --discovery-token-ca-cert-hash sha256:9cbcade33215c53c5b258c6800981a668f668f7778787c1d9383e3c4002c8c0a
Waiting for api server to startup
Warning: resource daemonsets/kube-proxy is missing the kubectl.kubernetes.io/last-applied-configuration annotation which is required by kubectl apply. kubectl apply should only be used on resources created declaratively by either kubectl create --save-config or kubectl apply. The missing annotation will be patched automatically.
daemonset.apps/kube-proxy configured
No resources found
2) cluster network 설치
kubectl apply -f https://raw.githubusercontent.com/cloudnativelabs/kube-router/master/daemonset/kubeadm-kuberouter.yaml
ㅇ 네트워크도 설치 완료하였다.
4. WorkNode 설치
ㅇ 추가적인 인스턴스를 생성하였다.
kubeadm join 192.168.0.23:6443 --token f8a2m8.bv3xhdb3ifuazmia \
--discovery-token-ca-cert-hash sha256:9cbcade33215c53c5b258c6800981a668f668f7778787c1d9383e3c4002c8c0a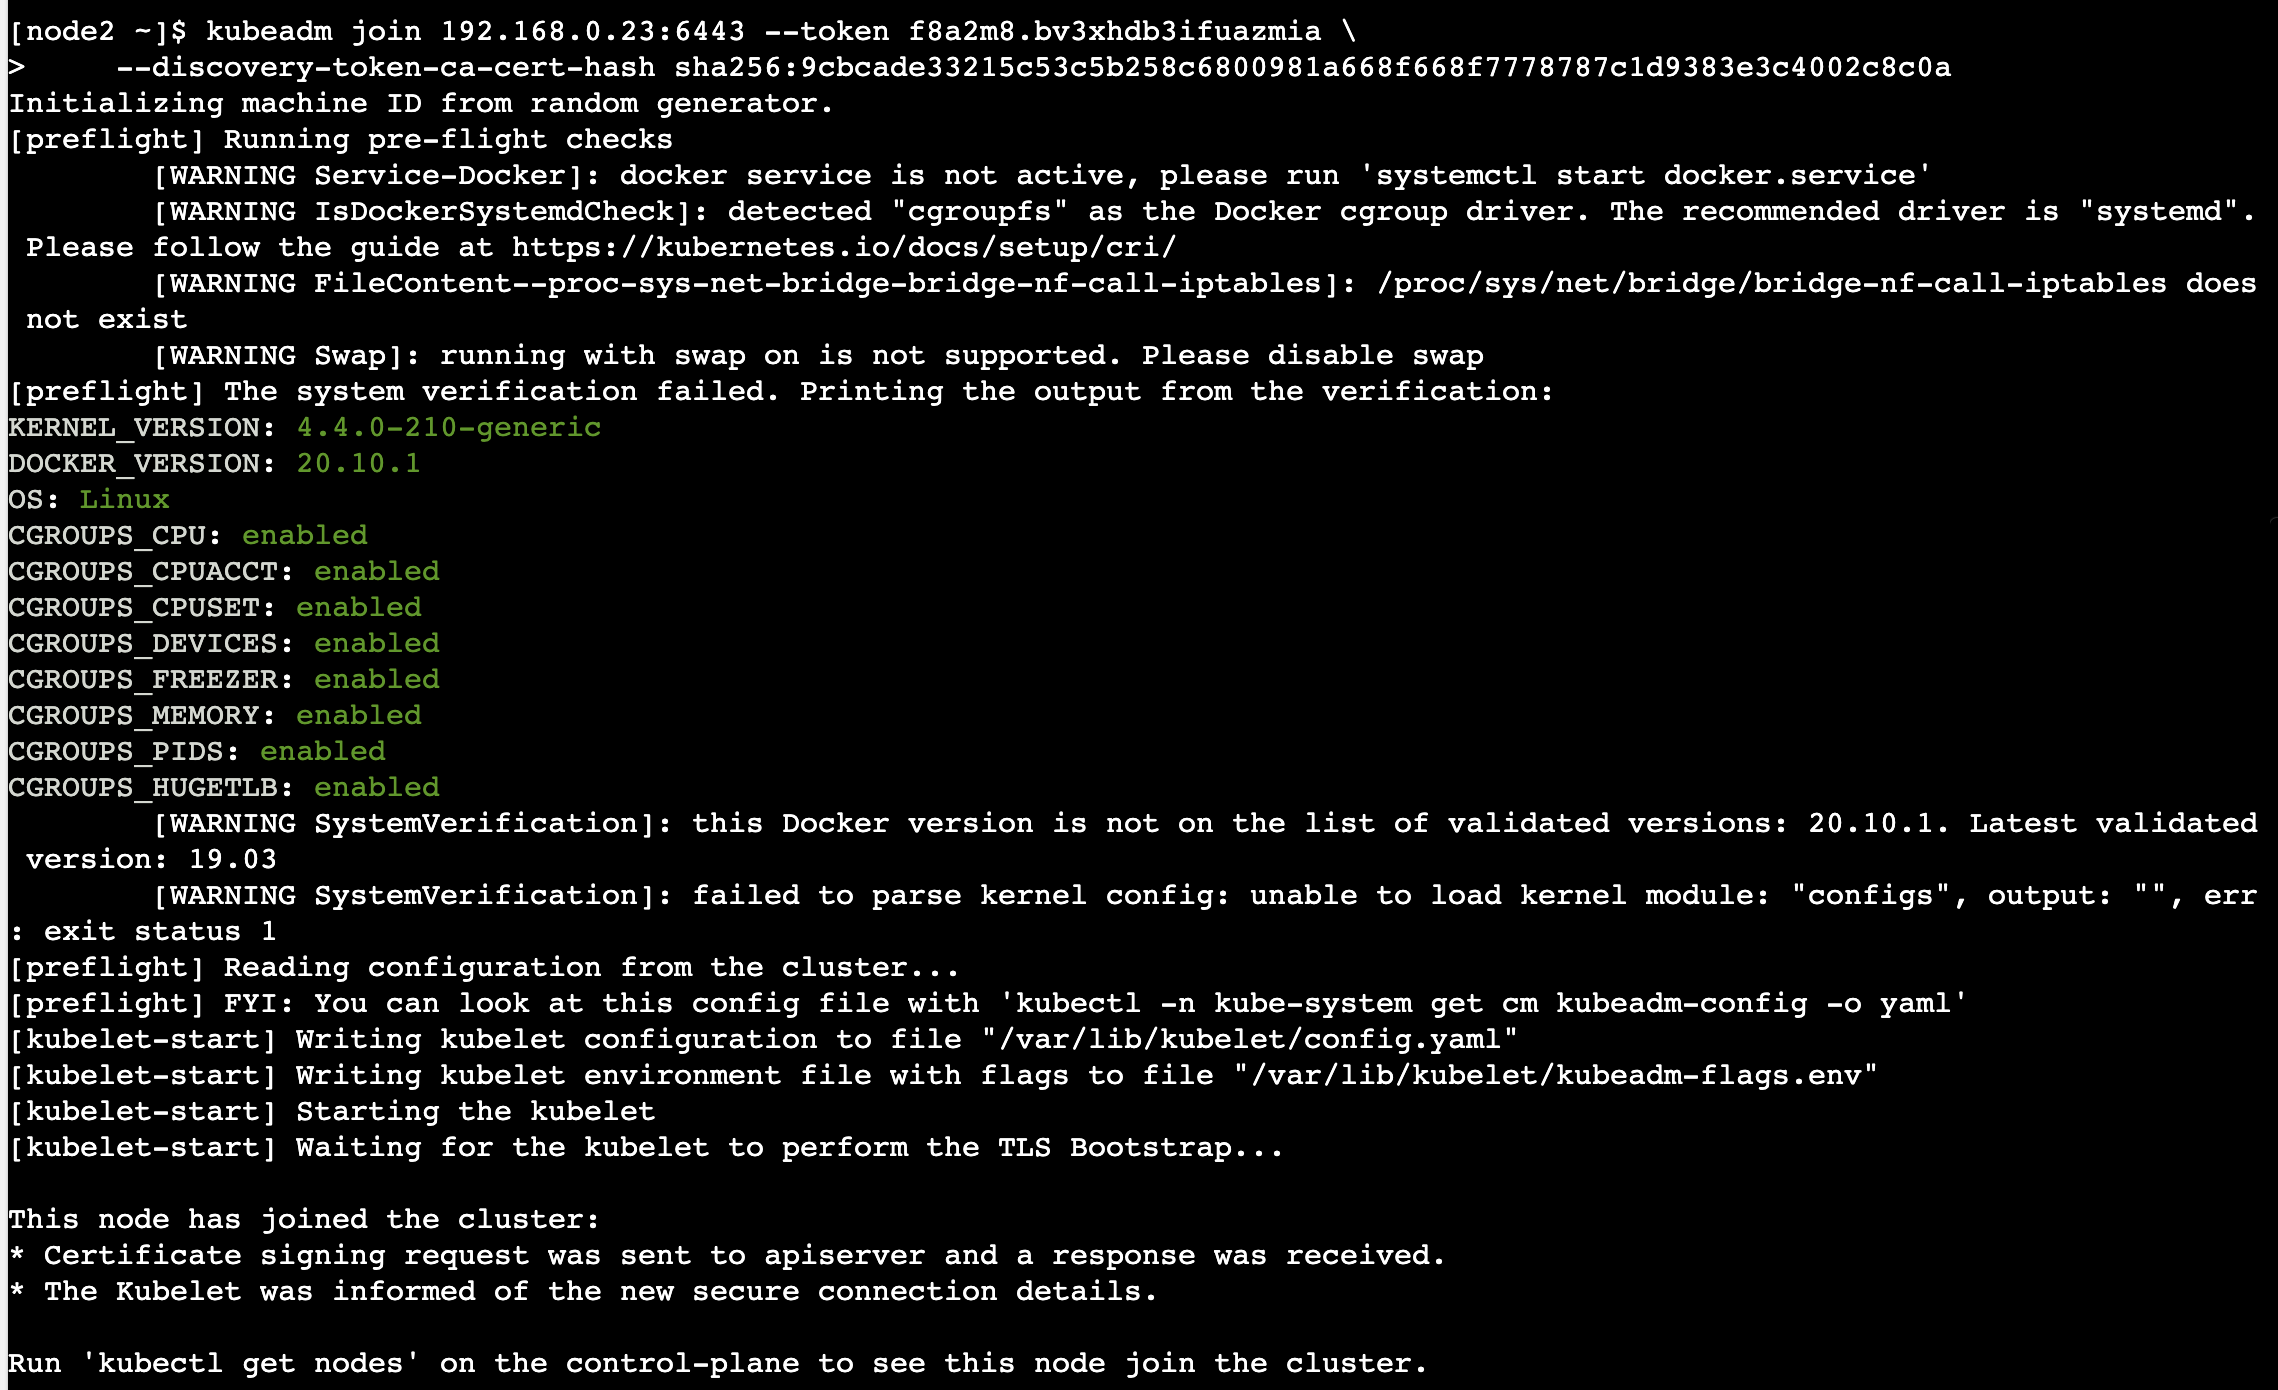
ㅇ Master와 연동을 위해 kubeadm을 통해 클러스터 연동을 실행하였다.
kubectl get nodes
ㅇ Master 노드에서 연동된 node들의 목록을 확인할 수 있었다.
5. nginx pod 생성해보기
kubectl apply -f https://raw.githubusercontent.com/kubernetes/website/master/content/en/examples/application/nginx-app.yaml
ㅇ 옵션이지만 nginx를 설치해 보았다.
kubectl get pods
ㅇ 설치된 Pod의 정보를 확인하였다. 3개의 파드가 생성되었다.
ㅁ play with Kubernetes Classroom
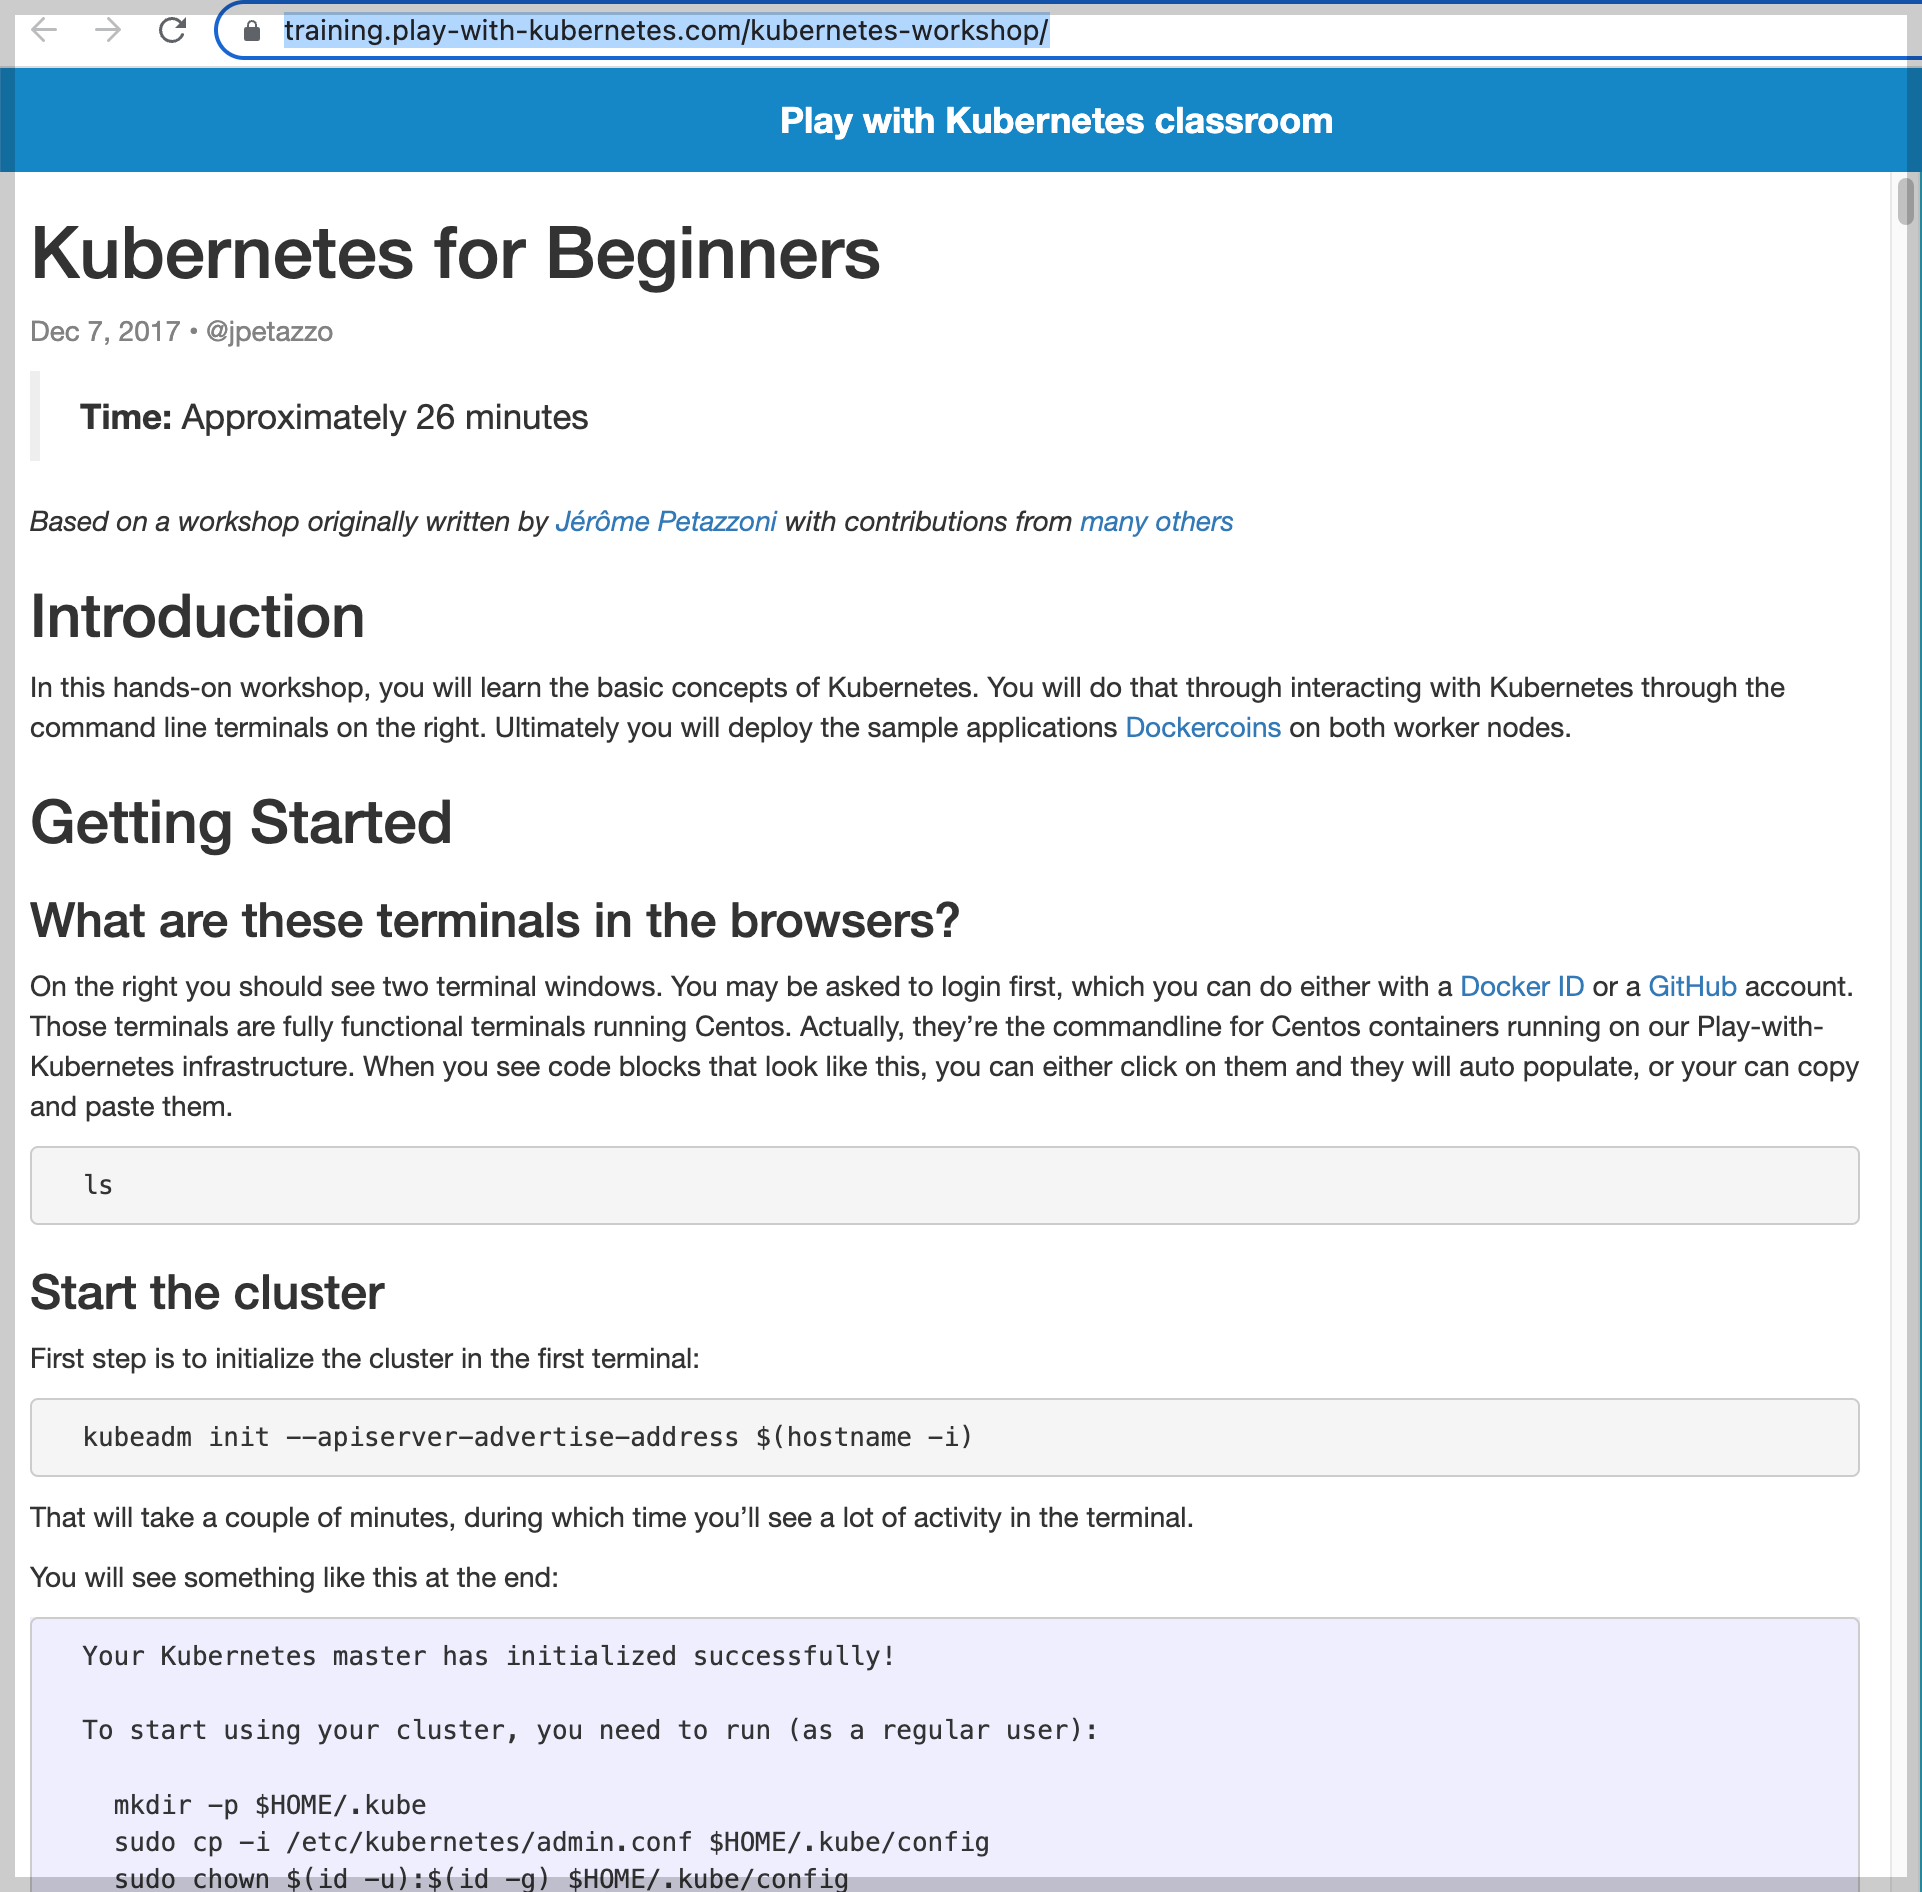
이 실습 워크숍에서는 Kubernetes의 기본 개념을 배울 수 있다. 오른쪽에 있는 명령줄 터미널을 통해 Kubernetes와 상호 작용하여 이를 수행한다. 궁극적으로 두 작업자 노드에 샘플 애플리케이션 Dockercoins를 배포하는 과정을 기술하였다. 기술된 과정을 수행하면서 기본적인 명령어와 설치과정을 배울 수 있다. 페이지 이동
ㅁ 함께 보면 좋은 사이트
ㅇ https://labs.play-with-k8s.com/
Play with Kubernetes
Play with Kubernetes is a labs site provided by Docker and created by Tutorius. Play with Kubernetes is a playground which allows users to run K8s clusters in a matter of seconds. It gives the experience of having a free Alpine Linux Virtual Machine in bro
labs.play-with-k8s.com
'Kubernetes > 기초공부' 카테고리의 다른 글
| [kubernetes] Pod 재기동 방법, pod restart (0) | 2022.09.27 |
|---|---|
| [kubernetes] Ingress 와 egress 차이 (0) | 2022.08.13 |
| [kubernetes] Kubernetes란 (0) | 2022.07.02 |
| [Kubernetes] Pod의 종료 사이클과 Graceful Shutdown (0) | 2022.06.26 |
| [Kubernetes] Kubernetes환경에서 graceful shutdown이란 (0) | 2022.06.26 |


