
| 일 | 월 | 화 | 수 | 목 | 금 | 토 |
|---|---|---|---|---|---|---|
| 1 | 2 | 3 | 4 | 5 | 6 | 7 |
| 8 | 9 | 10 | 11 | 12 | 13 | 14 |
| 15 | 16 | 17 | 18 | 19 | 20 | 21 |
| 22 | 23 | 24 | 25 | 26 | 27 | 28 |
| 29 | 30 | 31 |
- golang
- 오블완
- Spring
- PETERICA
- Kubernetes
- Pinpoint
- APM
- 정보처리기사 실기 기출문제
- aws
- kotlin
- 티스토리챌린지
- Linux
- Rag
- 바이브코딩
- MySQL
- CKA
- 기록으로 실력을 쌓자
- SRE
- kotlin coroutine
- CKA 기출문제
- AWS EKS
- minikube
- go
- CloudWatch
- 공부
- Java
- AI
- LLM
- tucker의 go 언어 프로그래밍
- 코틀린 코루틴의 정석
- Today
- Total
피터의 개발이야기
[kubernetes] helm을 이용한 AWS prometheus설치 후 도메인 연결 본문

ㅁ 개요
ㅇ minikube 환경에서 실습을 수행한 적이 있다. 여기
ㅇ AWS Kubernetes 모니터링을 위한 prometheus 설치 연습
ㅇ AWS 문서: Prometheus의 제어 플레인 지표
ㅇ Helm을 사용하여 배포
1. Prometheus 네임스페이스를 생성
kubectl create namespace prometheus
2. prometheus-community 차트 리포지토리를 추가
helm repo add prometheus-community https://prometheus-community.github.io/helm-charts
3. Prometheus를 배포
helm upgrade -i prometheus prometheus-community/prometheus \
    --namespace prometheus \
    --set alertmanager.persistentVolume.storageClass="gp2",server.persistentVolume.storageClass="gp2"
[ec2-user@ip-172-31-43-214 ~]$ helm repo add prometheus-community https://prometheus-community.github.io/helm-charts
"prometheus-community" already exists with the same configuration, skipping
[ec2-user@ip-172-31-43-214 ~]$ helm upgrade -i prometheus prometheus-community/prometheus \
>     --namespace prometheus \
>     --set alertmanager.persistentVolume.storageClass="gp2",server.persistentVolume.storageClass="gp2"
Error: Kubernetes cluster unreachable: exec plugin: invalid apiVersion "client.authentication.k8s.io/v1alpha1"
ㅇ 에러가 발생하여 트러블슈팅을 하였다. 수행과정은 이곳에 정리하였다.
[ec2-user@ip-172-31-43-214 ~]$ helm upgrade -i prometheus prometheus-community/prometheus \
>     --namespace prometheus \
>     --set alertmanager.persistentVolume.storageClass="gp2",server.persistentVolume.storageClass="gp2"
Release "prometheus" does not exist. Installing it now.
NAME: prometheus
LAST DEPLOYED: Mon Aug  1 03:07:56 2022
NAMESPACE: prometheus
STATUS: deployed
REVISION: 1
TEST SUITE: None
NOTES:
The Prometheus server can be accessed via port 80 on the following DNS name from within your cluster:
prometheus-server.prometheus.svc.cluster.local


Get the Prometheus server URL by running these commands in the same shell:
  export POD_NAME=$(kubectl get pods --namespace prometheus -l "app=prometheus,component=server" -o jsonpath="{.items[0].metadata.name}")
  kubectl --namespace prometheus port-forward $POD_NAME 9090


The Prometheus alertmanager can be accessed via port 80 on the following DNS name from within your cluster:
prometheus-alertmanager.prometheus.svc.cluster.local


Get the Alertmanager URL by running these commands in the same shell:
  export POD_NAME=$(kubectl get pods --namespace prometheus -l "app=prometheus,component=alertmanager" -o jsonpath="{.items[0].metadata.name}")
  kubectl --namespace prometheus port-forward $POD_NAME 9093
#################################################################################
######   WARNING: Pod Security Policy has been moved to a global property.  #####
######            use .Values.podSecurityPolicy.enabled with pod-based      #####
######            annotations                                               #####
######            (e.g. .Values.nodeExporter.podSecurityPolicy.annotations) #####
#################################################################################


The Prometheus PushGateway can be accessed via port 9091 on the following DNS name from within your cluster:
prometheus-pushgateway.prometheus.svc.cluster.local


Get the PushGateway URL by running these commands in the same shell:
  export POD_NAME=$(kubectl get pods --namespace prometheus -l "app=prometheus,component=pushgateway" -o jsonpath="{.items[0].metadata.name}")
  kubectl --namespace prometheus port-forward $POD_NAME 9091

For more information on running Prometheus, visit:
https://prometheus.io/
ㅇ 성공 시 화면 전문이다.
ㅇ Prometheus server URL, Alertmanager URL, PushGatewat URL 설정방법을 안내하고 있다.
ㅁ Prometheus server URL로 접속 테스트
[ec2-user@ip-172-31-43-214 ~]$   export POD_NAME=$(kubectl get pods --namespace prometheus -l "app=prometheus,component=server" -o jsonpath="{.items[0].metadata.name}")
[ec2-user@ip-172-31-43-214 ~]$   kubectl --namespace prometheus port-forward $POD_NAME 9090
Forwarding from 127.0.0.1:9090 -> 9090
Forwarding from [::1]:9090 -> 9090

[ec2-user@ip-172-31-43-214 ~]$ curl 127.0.0.1:9090
<a href="/graph">Found</a>.
ㅇ 현재 service type이 clusterIP이기 때문에 클러스터 내부에서만 접속이 가능한 상태이다.
ㅇ 외부에서 접속이 가능하게 만들어 보자.
ㅁ Service Type 변경
[ec2-user@ip-172-31-43-214 ~]$ kubectl edit -n prometheus service prometheus-server
# Please edit the object below. Lines beginning with a '#' will be ignored,
# and an empty file will abort the edit. If an error occurs while saving this file will be
# reopened with the relevant failures.
#
apiVersion: v1
kind: Service
metadata:
  annotations:
    meta.helm.sh/release-name: prometheus
    meta.helm.sh/release-namespace: prometheus
  creationTimestamp: "2022-08-01T03:07:57Z"
  finalizers:
  - service.kubernetes.io/load-balancer-cleanup
  labels:
    app: prometheus
    app.kubernetes.io/managed-by: Helm
    chart: prometheus-15.11.0
    component: server
    heritage: Helm
    release: prometheus
  name: prometheus-server
  namespace: prometheus
  resourceVersion: "61540"
  uid: 2c6f8e9d-25f0-4371-8f59-4eb43ad434bc
spec:
  clusterIP: 10.100.242.84
  clusterIPs:
  - 10.100.242.84
  externalTrafficPolicy: Cluster
  ports:
  - name: http
    nodePort: 30961
    port: 80
    protocol: TCP
    targetPort: 9090
  selector:
    app: prometheus
    component: server
    release: prometheus
  sessionAffinity: None
  type: LoadBalancer
status:
  loadBalancer:
    ingress:
    - hostname: a2c6f8e9d25f043718f594eb43ad434b-2060035698.ap-northeast-2.elb.amazonaws.com
ㅇkubectl edit -n prometheus service prometheus-server 명령어로 편집모드로 들어간다.
ㅇ spec.type을 LoadBalancer로 변경하였다.
ㅇ 외부 접속 port=80
ㅇ node 접속 port=30961
ㅇ 컨테이너 내부 port=9090
ㅇ 마지막 줄에 hostname은 로드밸런스에 할당된 DNS 정보이다.
[ec2-user@ip-172-31-43-214 ~]$ kubectl describe -n prometheus service prometheus-server
Name:                     prometheus-server
Namespace:                prometheus
Labels:                   app=prometheus
                          app.kubernetes.io/managed-by=Helm
                          chart=prometheus-15.11.0
                          component=server
                          heritage=Helm
                          release=prometheus
Annotations:              meta.helm.sh/release-name: prometheus
                          meta.helm.sh/release-namespace: prometheus
Selector:                 app=prometheus,component=server,release=prometheus
Type:                     LoadBalancer
IP Families:              <none>
IP:                       10.100.242.84
IPs:                      10.100.242.84
LoadBalancer Ingress:     a2c6f8e9d25f043718f594eb43ad434b-2060035698.ap-northeast-2.elb.amazonaws.com
Port:                     http  80/TCP
TargetPort:               9090/TCP
NodePort:                 http  30961/TCP
Endpoints:                192.168.62.144:9090
Session Affinity:         None
External Traffic Policy:  Cluster
Events:                   <none>
ㅇ LoadBalancer Ingress
a2c6f8e9d25f043718f594eb43ad434b-2060035698.ap-northeast-2.elb.amazonaws.com
ㅁ 로드밸런스 확인
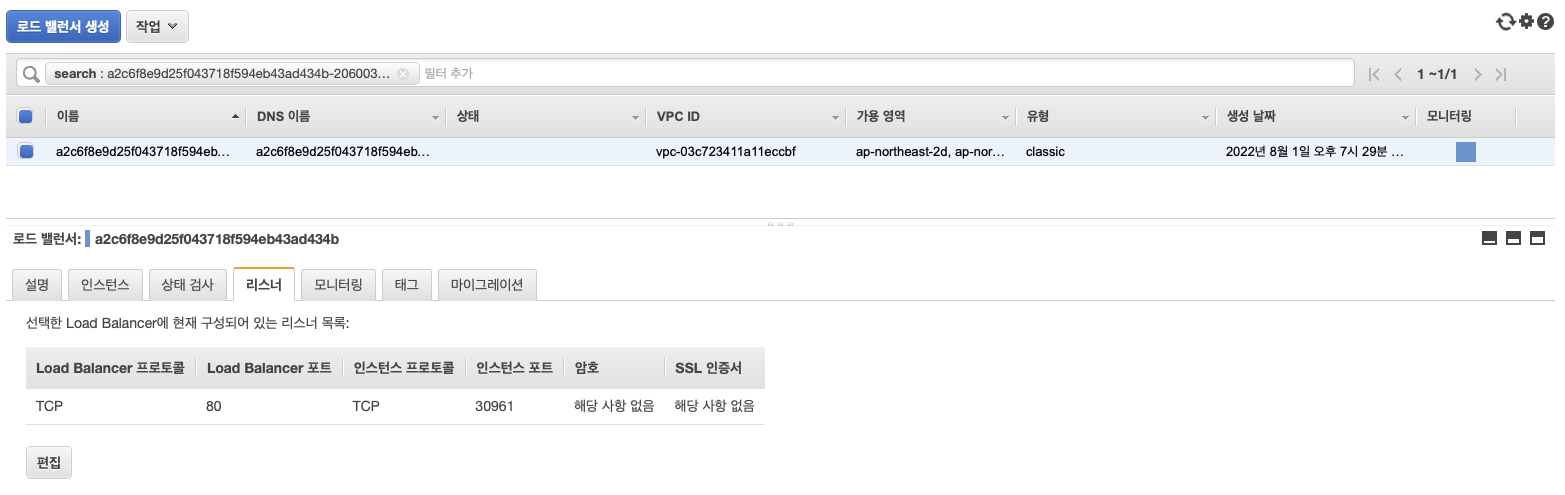
ㅇ 서비스를 수정하면, 새로운 로드밸런스가 생성된다.
ㅇ LoadBalancer Ingress에 적용된 DNS 정보(a2c6f8e9d25f043718f594..)를 확인 할 수 있다.

ㅇ 로드밸런스에 적용된 도메인 정보로도 접속이 가능하다.
ㅇ 하지만 너무 길기 때문에 도메인에 연동하는 것이 보기 좋다.
ㅁ 도메인 연결
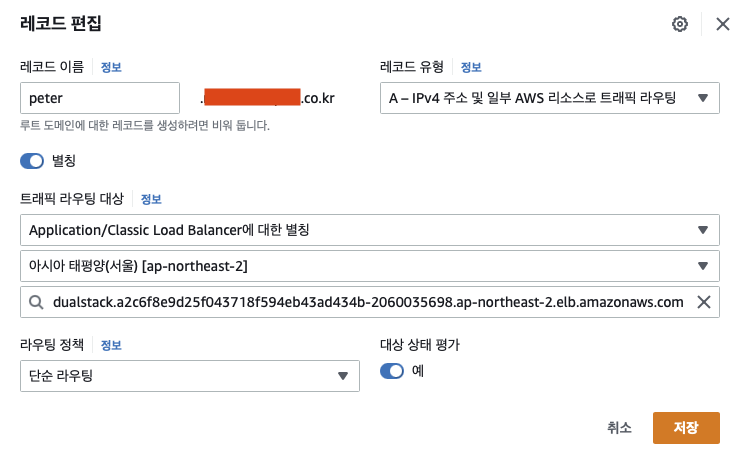
ㅇ 기존에 사용 중이던 peter.**********.co.kr 서브도메인을 수정하여 로드밸런스를 연결하였다.
ㅁ 도메인 접속 확인
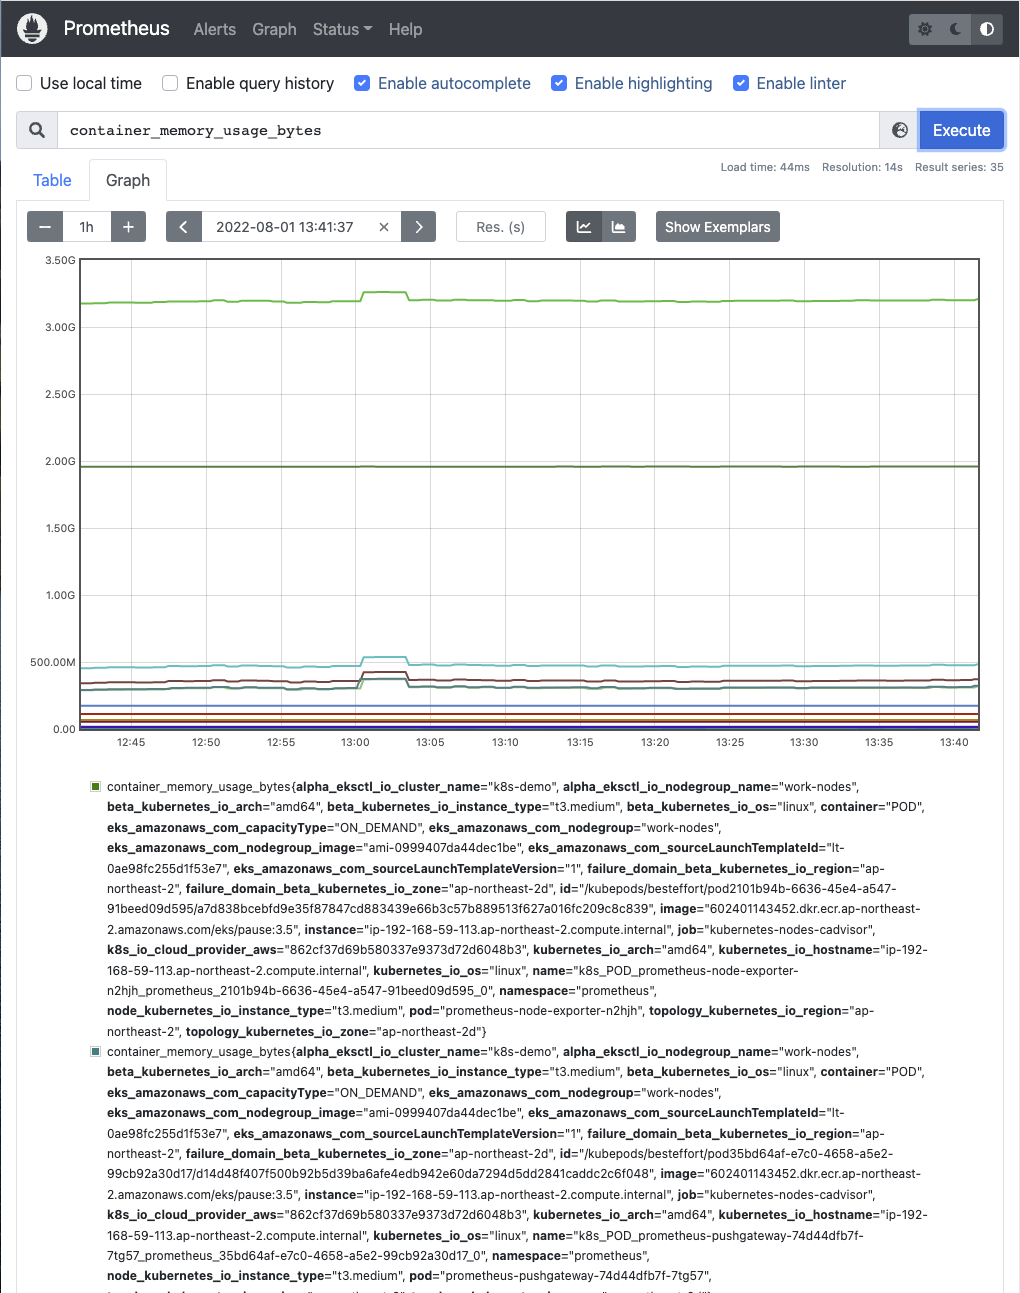
ㅇ container_memory_usage_bytes 입력한 후 실행한 모습이다.
ㅁ 테스트 완료 후 worknode 정리
eksctl scale nodegroup --name=work-nodes --cluster=k8s-demo --nodes=0 --nodes-min=0ㅇ 테스트 완료 후 worknode를 0으로 만들어야 비용을 아낄 수 있다.


ㅇ 실제로 인스턴스가 최소용량 0, 원하는 용량 0으로 변경 되었고, work-node 인스턴스도 다 종료되었다.
ㅁ 함께 보면 좋은 사이트
Prometheus의 제어 플레인 지표 - Amazon EKS
이 명령을 실행할 때 Error: failed to download "stable/prometheus" (hint: running `helm repo update` may help) 오류가 발생하면 helm repo update를 실행한 다음 2단계 명령을 다시 실행해봅니다. Error: rendered manifests contain
docs.aws.amazon.com
'Kubernetes > Helm' 카테고리의 다른 글
| [Helm] MySQL 설치하기 (0) | 2023.06.02 |
|---|---|
| [helm] helm으로 redis, grafana 설치과정 (0) | 2023.04.19 |
| [Helm] Helm으로 jenkins 설치하기 (0) | 2022.10.01 |
| [kubernetes] Helm 사용법 (0) | 2022.09.17 |
| [kubernetes] Helm이란 (0) | 2022.09.12 |


