| 일 | 월 | 화 | 수 | 목 | 금 | 토 |
|---|---|---|---|---|---|---|
| 1 | 2 | 3 | 4 | 5 | 6 | 7 |
| 8 | 9 | 10 | 11 | 12 | 13 | 14 |
| 15 | 16 | 17 | 18 | 19 | 20 | 21 |
| 22 | 23 | 24 | 25 | 26 | 27 | 28 |
- Rag
- SRE
- CloudWatch
- AI
- 바이브코딩
- 코틀린 코루틴의 정석
- Java
- tucker의 go 언어 프로그래밍
- Kubernetes
- kotlin
- aws
- LLM
- go
- CKA 기출문제
- 기록으로 실력을 쌓자
- MySQL
- 공부
- 오블완
- Linux
- kotlin coroutine
- PETERICA
- CKA
- golang
- Spring
- 티스토리챌린지
- 정보처리기사 실기 기출문제
- AWS EKS
- minikube
- APM
- Pinpoint
- Today
- Total
피터의 개발이야기
[Spring] Spring에서 APPLE로그인 구현하기 본문

서론
개발 프로젝트에서 Apple로그인을 적용하였습니다.
프론트 개발자와 협업하여 Apple로그인을 구현하였고, 이 포스팅은 백엔드의 입장에서 정리를 해 보았습니다.
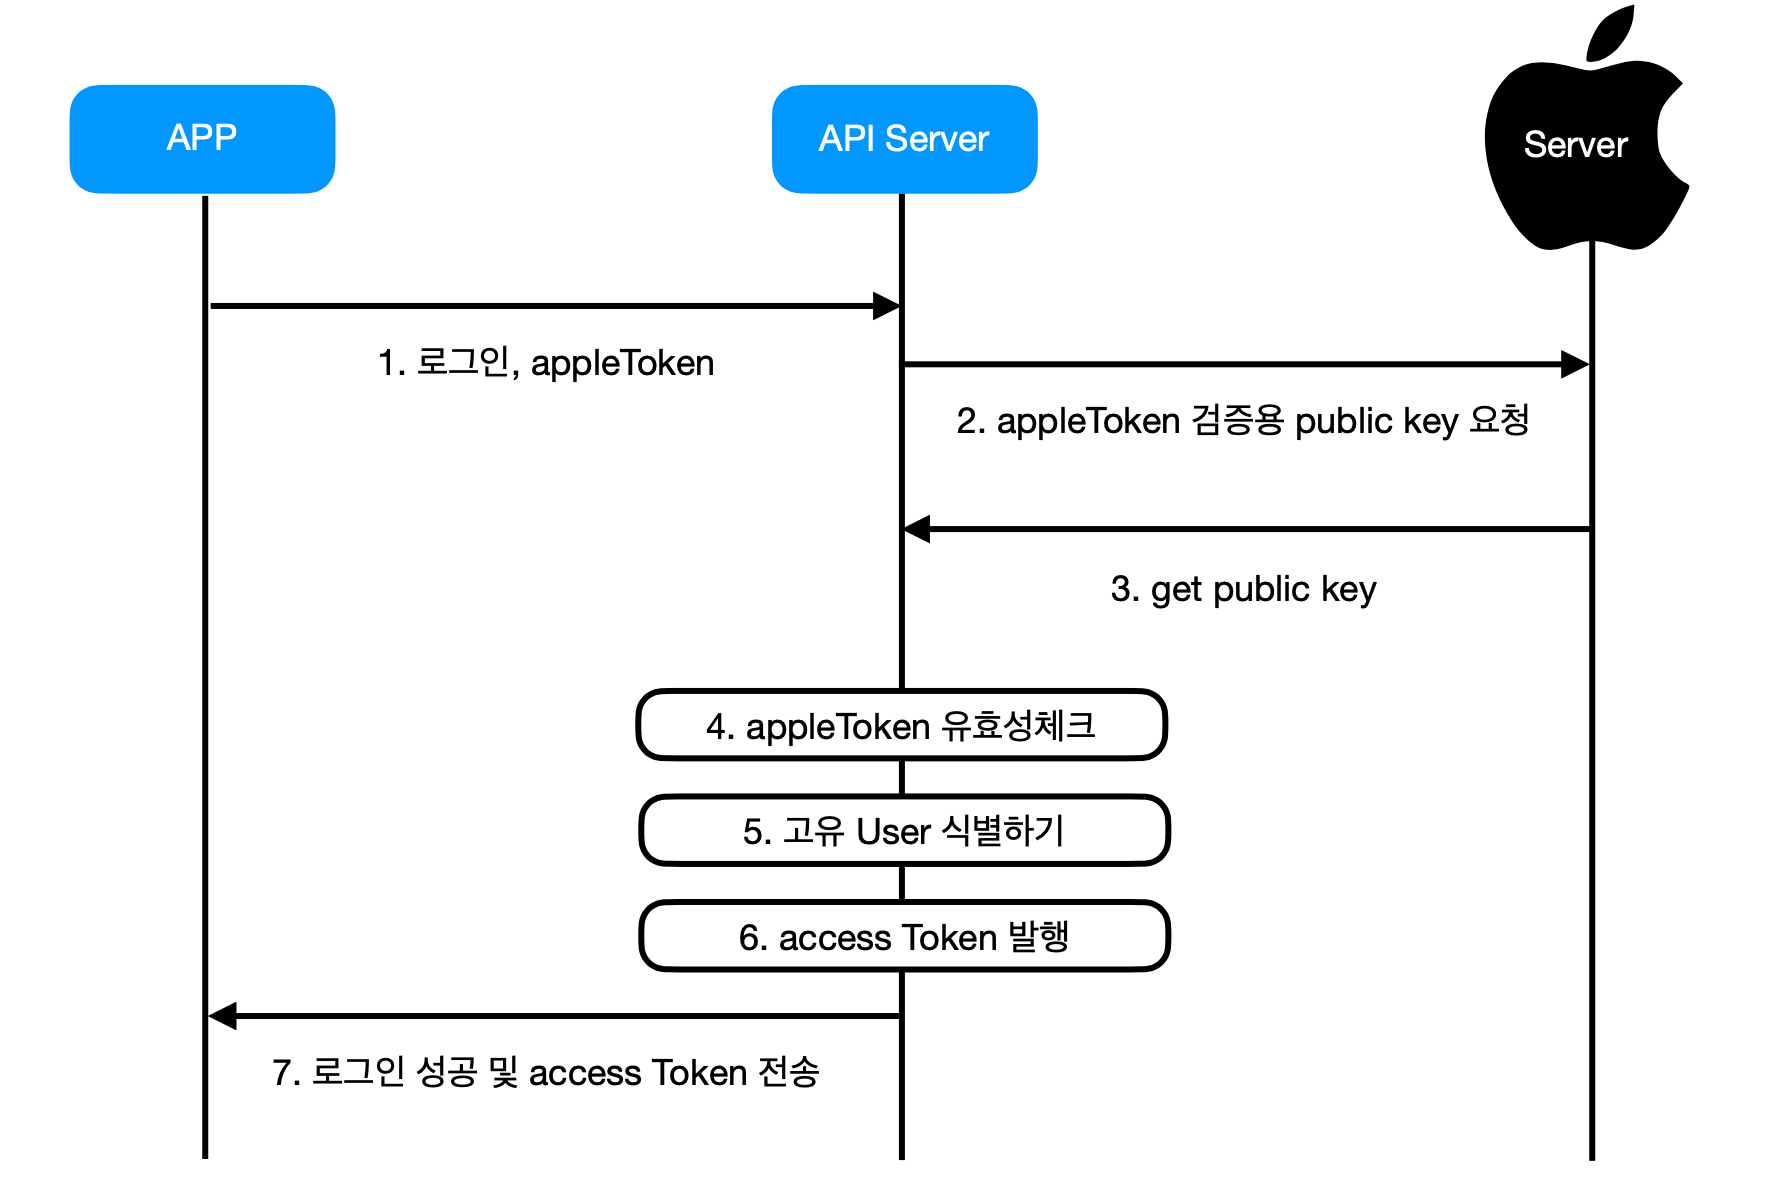
앱에서 APPLE로그인 성공 후 인증된 appleToken을 가지고 서버에서 처리하는 과정입니다.
인증과정

APP에서 인증하고 API Server에서 또 인증?
상식적으로 이해가 되지 않았다. 앱에서 apple Token이 생성되었다면, 이미 로그인 성공인데, API 서버에서 그 인증 토큰을 다시 검증해야하는 과정이 이해가 되지 않았다. 하지만 앱으로부터 appleToken을 받을 때에 이 요청이 탈취될 수 있는 것이다. 그래서 요청을 탈취한 사용자가 정보를 도용할 수 없도록 서버에서 인증과정을 한번 더 거쳐야 한다.
Gradle 세팅
// JWT
compile group: 'io.jsonwebtoken', name: 'jjwt', version: '0.9.0'
compile group: 'com.auth0', name: 'java-jwt', version: '3.4.0'

//RestTemplate
compile group: 'com.squareup.retrofit2', name: 'retrofit', version: '2.2.0'
compile group: 'com.squareup.retrofit2', name: 'converter-gson', version: '2.2.0'
compile group: 'com.squareup.retrofit2', name: 'converter-simplexml', version: '2.3.0'
AppleToken 검증 메인로직
public Map<String, Object>  getUserIdAppleIdToken(String token) throws Exception{


    if (Strings.isNullOrEmpty(token)) {
        throw new throw new NullPointerException("필수 요청 파라미터가 없습니다.");
    }

    Jws<Claims> jws = null;

    try {
        //
        DecodedJWT jwt = JWT.decode(token);
        String kid = jwt.getKeyId();
        List<String> aud = jwt.getAudience();

        // 2. appleToken 검증용 public key 요청
        PublicKey publicKey = appleRestClient.getPublicKey(kid); // apple 에서 public key 받아옴

        if(publicKey == null)
        	throw new  if(publicKey == null) throw new AuthenticationException("인증정보가 유효하지 않습니다.");

        JwtParser jwtParser = Jwts.parser().requireIssuer(appleRestClient.getApiUrl());
        jwtParser.requireAudience(appleRestClient.getAudience());

        //유효성 체크
        jws = Jwts.parser().setSigningKey(publicKey).parseClaimsJws(token);

    } catch (SignatureException e) {
        log.info("Invalid JWT signature.");
        throw new AuthenticationException("인증정보가 유효하지 않습니다.");
    } catch (MalformedJwtException e) {
        log.info("Invalid JWT token.");
        throw new AuthenticationException("인증정보가 유효하지 않습니다.");
    } catch (ExpiredJwtException e) {
        log.info("Expired JWT token.");
        throw new AuthenticationException("인증정보가 유효하지 않습니다.");
    } catch (UnsupportedJwtException e) {
        log.info("Unsupported JWT token.");
        throwthrow new AuthenticationException("인증정보가 유효하지 않습니다.");
    } catch (IllegalArgumentException e) {
        log.info("JWT token compact of handler are invalid.");
        throw new AuthenticationException("인증정보가 유효하지 않습니다.");
    } catch (Exception e){
        log.error("getUserIdAppleIdToken", e);
        throw new AuthenticationException("인증정보가 유효하지 않습니다.");
    }

    String sub = String.valueOf( jws.getBody().get("sub")); // user 식별자

    String email = String.valueOf(jws.getBody().get("email"));
    Map<String, Object> dataMap = authRepository.getUserIdByAppleIdToken(sub); // apple 계정이 있는지
    if (dataMap == null || dataMap.get("user_id") == null) {
        dataMap = authRepository.getUserIdByEmail(email); // email 동일한 아이디 있는지 체크
        if (dataMap == null || dataMap.get("user_id") == null) {
            throw new CustomBadCredentialException(RETURN_CODE.NO_ACCOUNT); // 계정이 없음.
        }
    }

    // 사용자 정보 업데이트
    if (dataMap != null && dataMap.get("user_id") != null && dataMap.get("apple_uid") == null) {
        dataMap.put("apple_uid", sub);
        String encEmail =authUtil.generateEncryptedKey(email);
        dataMap.put("email", encEmail); // 이메일은 암호화 해서 넣는다.
        log.info("the Email from apple token: "+ email);
        log.info("this is EncryptedEmail:"+encEmail);
        authRepository.updateAppleUid(dataMap);
    }
    return dataMap;
}
현재 서비스는 구글로그인과 애플로그인, ID/Password로그인이 혼용되고 있다. 어떤 사이트의 경우 개별 로그인에 따라 UserID가 발급되어 실질적인 한 유저가 여러 UserID를 가질 수 있지만, 현재의 서비스에서는 email을 고유Identity로 하여 하나의 UserID로 관리하고 있다.
애플로그인의 경우 apple user identity인 sub을 통해 기존 apple계정을 식별하고, 만약 없을 시에는 email로 한번 더 사용자를 조회한다.
AppleRestClient.java
@Slf4j
@Component
public class AppleRestClient {

	private final String API_URL = "https://appleid.apple.com";
	private final String OWNER_AUD = "xxxxxxxxx";

	private AppleApi appleApi = null;

	@PostConstruct
	public void init() {
		Retrofit retrofit = new Retrofit.Builder()
				.baseUrl(API_URL)
				.addConverterFactory(GsonConverterFactory.create())
				.build();

		this.appleApi = retrofit.create(AppleApi.class);
	}

	public String getApiUrl(){
		return this.API_URL;
	}
	public String getAudience() {
		return this.OWNER_AUD;
	}

	public PublicKey getPublicKey(String kid) {
		Call<AppleKeyResponse> call = appleApi.getAuthKeys();

		try {
			Response<AppleKeyResponse> response = call.execute();
			if (response.isSuccessful()) {
				byte[] nBytes ={};
				byte[] eBytes ={};
				for(int i=0; i< response.body().getKeys().size(); i++){
					LinkedTreeMap linkedTreeMap = ((LinkedTreeMap) response.body().getKeys().get(i));
					String temp = String.valueOf(linkedTreeMap.get("kid"));
					//응답 값 중 jwt kid 와 동일한 값을 꺼내와 public key를 생성해야한다.
					if(temp.equals(kid)){
						nBytes = Base64.getUrlDecoder().decode(String.valueOf(linkedTreeMap.get("n")));
						eBytes = Base64.getUrlDecoder().decode(String.valueOf(linkedTreeMap.get("e")));
					}
				}
				if (nBytes.length==0 || eBytes.length ==0){
					throw new AuthenticationException("인증정보가 유효하지 않습니다.")
				}
				// 응답받은 n, e 값은 base64로 인코딩 되어 있기 때문에
				// 반드시 디코딩하고나서 public key로 만들어야 한다.
				BigInteger n = new BigInteger(1, nBytes);
				BigInteger e = new BigInteger(1, eBytes);
				KeyFactory keyFactory = KeyFactory.getInstance("RSA");
				KeySpec publicKeySpec = new RSAPublicKeySpec(n, e);
				PublicKey publicKey = keyFactory.generatePublic(publicKeySpec);
				return publicKey;
			}
		} catch (IOException e) {
			log.error(e.getMessage());
		} catch (Exception e) {
			log.error(e.getMessage());
		}

		return null;
	}

}
Apple에서 public key를 요청하는 부분이다.
참고로 JWT의 key rotation에 대해서 알아야한다.
key가 여러개인 이유는 데이터 보호에 있다. 만약 데이터가 하나의 key로만 암호화하면 key가 유출되었을 때에 모든 데이터가 유출된다. 이런 위험성을 줄이기 위해 주기적으로 key를 변경해야 하는데, 이것을 key rotation 이라고 한다. key가 유출되더라도, 어느 기간동안 생성된 데이터만 복호화될 뿐, 다른 데이터는 안전할 수 있다.
AppleApi.java
import retrofit2.Call;
import retrofit2.http.GET;

public interface AppleApi {

    @GET("/auth/keys")
    Call<AppleKeyResponse> getAuthKeys();
}
AppleKeyResponse.java
@Data
public class AppleKeyResponse<T> {

	@SerializedName("keys")
	List<T> keys;

}
Apple 로그인이 무엇인지 공부했던 참고 사이트들
'Programming > Spring' 카테고리의 다른 글
| [Spring] JCenter란 (0) | 2021.01.15 |
|---|---|
| [Spring] @Component에 잘못 알고 있었던 점 (0) | 2021.01.13 |
| [Spring] 컨트롤러 액션에서 외부 URL로 redirection (0) | 2021.01.10 |
| [SpringBoot] SpringBoot 슬랙 연동하기 (0) | 2021.01.09 |
| [Spring] Spring Boot에 Swagger 붙이기 (0) | 2021.01.04 |


