| 일 | 월 | 화 | 수 | 목 | 금 | 토 |
|---|---|---|---|---|---|---|
| 1 | 2 | 3 | 4 | 5 | 6 | 7 |
| 8 | 9 | 10 | 11 | 12 | 13 | 14 |
| 15 | 16 | 17 | 18 | 19 | 20 | 21 |
| 22 | 23 | 24 | 25 | 26 | 27 | 28 |
- MySQL
- Spring
- go
- aws
- LLM
- CloudWatch
- PETERICA
- 코틀린 코루틴의 정석
- golang
- Pinpoint
- APM
- 티스토리챌린지
- AI
- kotlin coroutine
- Java
- 바이브코딩
- Kubernetes
- AWS EKS
- 기록으로 실력을 쌓자
- Rag
- 공부
- tucker의 go 언어 프로그래밍
- kotlin
- 오블완
- 정보처리기사 실기 기출문제
- Linux
- SRE
- CKA 기출문제
- minikube
- CKA
- Today
- Total
피터의 개발이야기
[Ktor] Kotlin + Ktor + Eposed 환경에서 MySQL 연동하기 본문

ㅁ 들어가며
ㅇ 지난 글, Ktor란?을 정리하였는데, 요약하면 다음과 같다.
- Ktor는 JetBrains에서 개발한 Kotlin 전용 웹 개발 프레임워크로, 서버와 클라이언트 앱 개발을 모두 지원하며 코루틴 기반의 비동기 처리를 제공한다.
- Ktor의 주요 특징으로는 경량성, 코루틴 지원, 모듈형 아키텍처, 다양한 플랫폼 지원, 사용 편의성이 있다.
- Spring과 비교했을 때 Ktor는 부팅 속도가 빠르고 리소스 사용량이 적어, 마이크로서비스 아키텍처와 빠른 개발 및 배포가 필요한 상황에 적합하다.
ㅇ 이번 글에서는 경량화된 Ktor 애플리케이션에 SQL 데이터베이스를 통합하여 데이터를 저장하는 방법을 정리하였다.
ㅇ Spring을 사용하기 어려워하는 프론트개발자에게 추천해 줄 수 있다.
ㅇ Guide to SQL Database Integration with Ktor Applications 을 참조하여 작성하였다.
ㅁ 사전 준비
ㅇ IntelliJ IDEA 설치
ㅇ MySQL
ㅁ Ktor 애플리케이션 설정

ㅇ Ktor 웹 생성기에서 애플리케이션을 생성한다.
ㅇ 애플리케이션 이름을 지정한다 (예: ktor-mysql)

ㅇ Preview탭을 열면 구성된 프로젝트의 구조를 볼 수 있다.
ㅁ 플로그인 설정
다음과 같은 플러그인을 구성하였다.
ㅇ Routing
- 서버에 대한 요청을 수신할 경로를 설정
ㅇ Call Logging
- 경로 모니터링 및 로그 제공
ㅇ Content Negotiation
- 애플리케이션에서 송수신한 데이터(예: JSON)를 다른 형식(일반적으로 데이터 클래스)으로 직렬화/역직렬화하는 데 사용
ㅇ kotlinx.serialization
- 콘텐츠 협상과 함께 작동하여 JSON 직렬화를 처리
ㅇ Exposed (SQL 라이브러리)
- Kotlin용 경량 SQL 라이브러리로, 애플리케이션과 기본 SQL 데이터베이스 간의 브리지 역할
- 다양한 데이터베이스(예:Postgres,MySQL,MariaDB,SQLite,SQL server, 등)를 지원한다.
- 드라이버 클래스 이름과 JDBC URL만 변경하면 최소한의 코드 변경으로 쉽게 연결할 수 있다.
ㅁ 다운로드 및 Intellij 열기

ㅇ 프로젝트를 다운 받으면 zip으로 열리는데 압축해제하여 Intellij에서 열었다.
ㅇ Gradle 탭 > Tasks > application > run을 실행하였다.
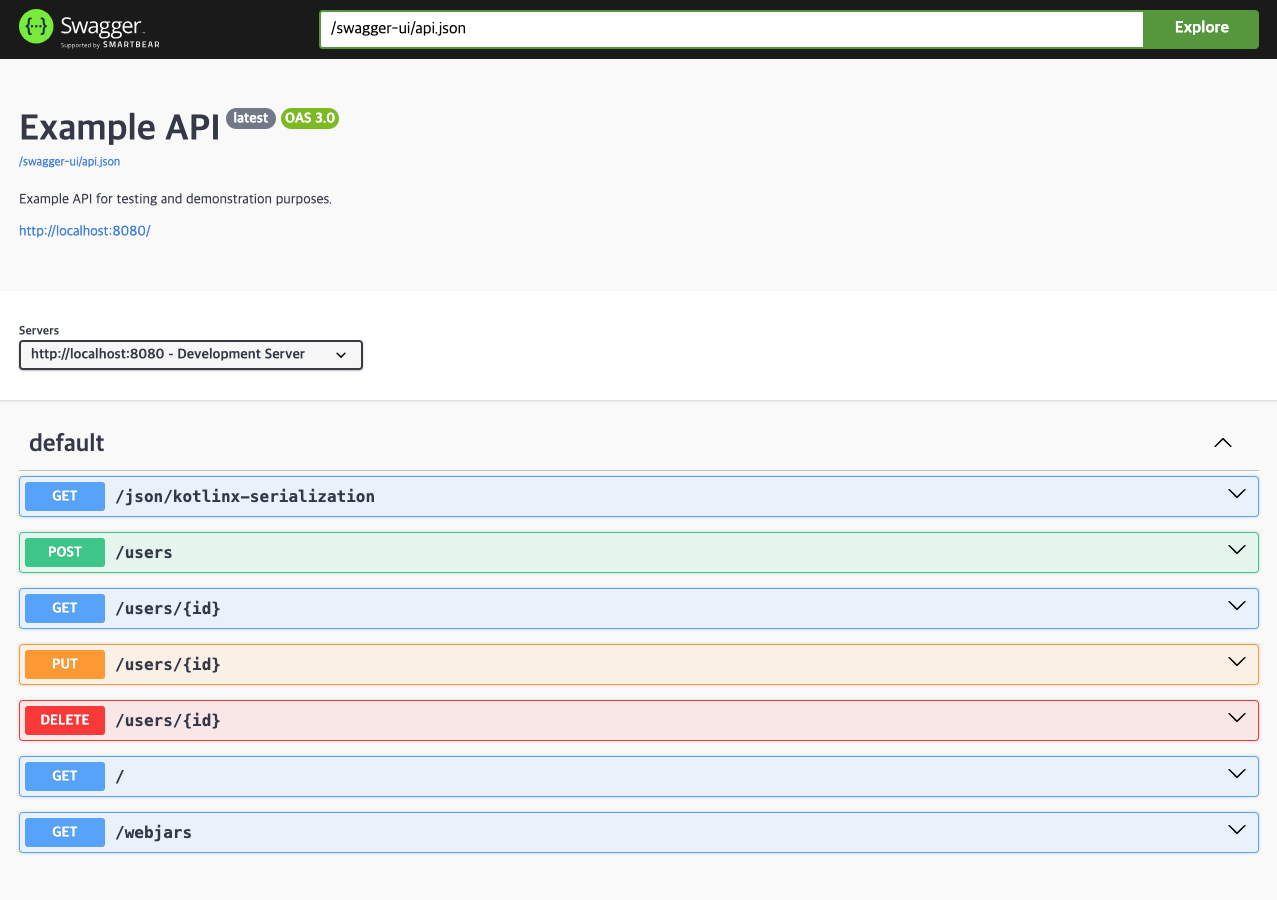
ㅇ Swagger URL(http://localhost:8080/swagger-ui/index.html#/ 로 접속하였다.
ㅇ MySQL은 추가적인 작업이 더 필요하다.
ㅁ MySQL 연결작업
storage {
  driverClassName = "com.mysql.cj.jdbc.Driver"
  jdbcURL = "jdbc:mysql://localhost:3306/db_name_here?user=db_username_here&password=db_password_here"
}
ㅇ 연결정보 추가
ㄴ application.conf 파일에 데이터베이스 연결 정보를 추가
# 추가
mysqlVersion=8.0.33
koinKtor=3.4.1
hikaricpVersion = 5.0.1
ㅇ 의존성 추가
ㄴ gradle.properties에 버젼 정보를 추가
val mysqlVersion:String by project
val koinKtor: String by project
val hikaricpVersion: String by project

dependencies {
    // mysql 드라이버
    implementation("mysql:mysql-connector-java:$mysqlVersion")

    // Koin for Ktor
    // 종속성 주입, 개발의 모듈성과 유연성을 향상
    implementation("io.insert-koin:koin-ktor:$koinKtor")

    // connection pooling
    // 연결 풀을 만들어 연결을 재사용하여 성능과 리소스를 최적화한다.
    implementation("com.zaxxer:HikariCP:$hikaricpVersion")
}
ㅇ build.gradle.kt에 의존성을 추가한다.
ㅇ gradle.properties에서 버젼정보를 가져와 dependencies에 버젼 정보가 주입된다.
ㅁ 모델 및 테이블 클래스 설정
데이터베이스의 테이블과 애플리케이션을 연결하는 작업이다.

ㅇ src/main/kotlin/com/example/model에 테이블 클래스를 정의하는 User와 City, 두개의 data class를 생성한다.
package com.example.model

import kotlinx.serialization.Serializable
import org.jetbrains.exposed.sql.ReferenceOption
import org.jetbrains.exposed.sql.Table

@Serializable
data class User(
    val name:String,
    val cityId:Int,
    val id:Int=0
)

object Users:Table(){
    val id=integer("id").autoIncrement()
    val name=varchar("name",255)
    val cityId=integer("city_id").references(Cities.id,ReferenceOption.CASCADE)

    override val primaryKey: PrimaryKey
        get() = PrimaryKey(id)
}
ㅇ User 테이블과 data class
@Serializable
data class City(
    val cityName:String,
    val id:Int=0
)

object Cities:Table(){
    val id=integer("id").autoIncrement()
    val cityName=varchar("city_name",255)

    override val primaryKey: PrimaryKey
        get() = PrimaryKey(id)
}
ㅇ City 테이블과 data class
ㅇ 어느 디비에 어느 테이블을 연결 할지는 정리되었다.
ㅇ DB Connection을 설정해야한다.
ㅁ Database Connection Setup
fun Application.configureDatabases() {
    val driverClass=environment.config.property("storage.driverClassName").getString()
    val jdbcUrl=environment.config.property("storage.jdbcURL").getString()
    val db=Database.connect(provideDataSource(jdbcUrl,driverClass))

    transaction(db){
        SchemaUtils.create(Users,Cities)
    }
}

private fun provideDataSource(url:String,driverClass:String):HikariDataSource{
    val hikariConfig= HikariConfig().apply {
        driverClassName=driverClass
        jdbcUrl=url
        maximumPoolSize=3
        isAutoCommit = false
        transactionIsolation = "TRANSACTION_REPEATABLE_READ"
        validate()
    }
    return HikariDataSource(hikariConfig)
}

suspend fun <T> dbQuery(block:suspend ()->T):T{
    return newSuspendedTransaction(Dispatchers.IO) { block() }
}
ㅇ HikariDataSource를 설정하였다.
ㅇ maximumPoolSize를 3개로 설정하였다.
ㅇ dbquery()함수는 Kotlin coroutine에서 비동기 트렌젝션을 위해 사용할 객체이다.
ㄴ [kotlin] 코틀린 코루틴의 정석- CoroutineDispatcher
ㄴ Dispatchers의 종류와 용도는 이곳에서 공부한 적 있다.
fun main(args: Array<String>) {
    io.ktor.server.netty.EngineMain.main(args)
}

fun Application.module() {
    configureDI()
    configureRouting()
    configureDatabases() <== 추가
    configureMonitoring()
    configureSerialization()
}
ㅇ위에서 만들어진 configureDatabases()는 main의 Application의 module에 추가한다.
ㅁ Data Access Object(DAO) 생성
package com.example.model

import kotlinx.serialization.Serializable

@Serializable
data class UserInfo(
    val name:String,
    val city:String
)
ㅇ 도시 이름이 있는 사용자에 대한 정보를 보여주는 데이터 클래스를 정의하였다.
ㅇ DB-Table-Connection이 연결되었고, 데이터를 담아올 DAO도 생성하였다.
ㅇ DAO에 데이터를 담아줄 Service를 생성해보자.
ㅁ Service 생성
interface CityService {
    suspend fun addCity(city: City): City?
    suspend fun getAllCities():List<City>
    suspend fun deleteCity(id:Int):Boolean
    suspend fun getAllUsersInfo():List<UserInfo>
}

interface UserService {
    suspend fun addUser(user: User):User?
    suspend fun updateUser(user: User):Boolean
    suspend fun deleteUser(user: User):Boolean
    suspend fun getUsers():List<User>
    suspend fun searchUser(query:String):List<User>
    suspend fun getUser(id:Int):User?
}
ㅇ Service를 생성하였다.
class CityServiceImpl : CityService {

	// Table 객체에서 Data 객체로 전달
    private fun resultRowToCity(resultRow: ResultRow):City{
        return City(
            cityName = resultRow[Cities.cityName],
            id = resultRow[Cities.id]
        )
    }

    override suspend fun addCity(city: City): City? = dbQuery {
        val insertStmt=Cities.insert {
            it[cityName]=city.cityName
        }
        insertStmt.resultedValues?.singleOrNull()?.let { resultRowToCity(it) }
    }

    override suspend fun getAllCities(): List<City> = dbQuery{
        Cities.selectAll().map { resultRowToCity(it) }
    }

    override suspend fun deleteCity(id: Int): Boolean= dbQuery {
        Cities.deleteWhere { Cities.id eq id }>0
    }

    override suspend fun getAllUsersInfo(): List<UserInfo> = dbQuery{
        (Users innerJoin Cities)
            .slice(Users.name,Cities.cityName)
            .selectAll()
            .map {
                UserInfo(
                    name = it[Users.name],
                    city = it[Cities.cityName]
                )
            }
    }
}

class UserServiceImpl : UserService {

    private fun resultRowToUser(row: ResultRow):User{
        return User(
            id = row[Users.id],
            name = row[Users.name],
            cityId = row[Users.cityId]
        )
    }

    override suspend fun addUser(user: User): User? = dbQuery{
        val insertStmt=Users.insert {
            it[name]=user.name
            it[cityId]=user.cityId
        }
        insertStmt.resultedValues?.singleOrNull()?.let { resultRowToUser(it) }
    }

    override suspend fun updateUser(user: User): Boolean = dbQuery{
        Users.update({Users.id eq user.id}){
            it[name]=user.name
        }>0
    }

    override suspend fun deleteUser(user: User): Boolean = dbQuery{
        Users.deleteWhere { name eq user.name }>0
    }

    override suspend fun getUsers(): List<User> = dbQuery{
        Users.selectAll().map { resultRowToUser(it) }
    }

    override suspend fun searchUser(query: String): List<User> = dbQuery{
        Users.select { (Users.name.lowerCase() like "%${query.lowercase()}%")}
            .map { resultRowToUser(it) }
    }

    override suspend fun getUser(id: Int): User? = dbQuery{
        Users.select { (Users.id eq id) }.map { resultRowToUser(it) }.singleOrNull()
    }
}
ㅇ 구현부인 ServiceImpl도 생성하였다.
    override suspend fun getAllUsersInfo(): List<UserInfo> = dbQuery{
        (Users innerJoin Cities)
            .slice(Users.name,Cities.cityName)
            .selectAll()
            .map {
                UserInfo(
                    name = it[Users.name],
                    city = it[Cities.cityName]
                )
            }
    }
ㅇ Users와 Cities를 Join하여 통합된 데이터를 가져올 수 있다.
ㅇ 위에 만들어진 Service와 구현체인 ServiceImpl를 앱 모듈에 주입해 주어야 한다.
ㅁ Service 의존성 주입
package com.example.di

import com.example.db.CityService
import com.example.db.CityServiceImpl
import com.example.db.UserService
import com.example.db.UserServiceImpl
import org.koin.dsl.module

val appModule= module {
    single<UserService> {
        UserServiceImpl()
    }
    single<CityService> {
        CityServiceImpl()
    }
}
ㅇ com/example/di/AppModule에 두 서비스를 모듈로 정의하였다.
fun Application.configureDI(){
    install(Koin){
        modules(appModule)
    }
}
ㅇ com/example/plugins에 DI 파일을 생성하여 Koin 플러그인과 모듈을 설정한다.
fun Application.module() {
    configureDI() <== 앱 모듈에 주입
    configureRouting()
    configureDatabases()
    configureMonitoring()
    configureSerialization()
}
ㅇ main에서 앱 모듈에 DI를 주입한다.
ㅇ 데이터를 Data Class로 가져오는 과정까지 완료하였다.
ㅇ 이를 클라이언트 요청을 처리할 경로를 설정해야한다.
ㅁ Route 설정
fun Routing.userRoute(userService: UserService){
    route("/users"){
        get {
            val users=userService.getUsers()
            call.respond(HttpStatusCode.OK,users)
        }
        post {
            val user=call.receive<User>()
            try {
                val result=userService.addUser(user)
                result?.let {
                    call.respond(HttpStatusCode.Created,it)
                } ?: call.respond(HttpStatusCode.NotImplemented,"Error adding user")
            }catch (e: ExposedSQLException){
                call.respond(HttpStatusCode.BadRequest,e.message ?: "SQL Exception!!")
            }
        }
        put{
            try {
                val user=call.receive<User>()
                val result=userService.updateUser(user)
                if (result){
                    call.respond(HttpStatusCode.OK,"Update successful")
                }else{
                    call.respond(HttpStatusCode.NotImplemented,"Update not done")
                }
            }catch (e: ExposedSQLException){
                call.respond(HttpStatusCode.BadRequest,e.message ?: "SQL Exception!!")
            }
        }
        delete{
            val user=call.receive<User>()
            val result=userService.deleteUser(user)
            if (result){
                call.respond(HttpStatusCode.OK,"Delete successful")
            }else{
                call.respond(HttpStatusCode.NotImplemented,"Delete not done")
            }
        }
        get("/search"){
            val query=call.request.queryParameters["q"].toString()
            val users=userService.searchUser(query)
            call.respond(HttpStatusCode.OK,users)
        }
        get("/{id}") {
            val id=call.parameters["id"]?.toInt()
            id?.let {
                userService.getUser(it)?.let {user->
                    call.respond(HttpStatusCode.OK,user)
                } ?: call.respond(HttpStatusCode.NotFound,"User not found")
            } ?: call.respond(HttpStatusCode.BadGateway,"Provide Input!!")
        }
    }
}
ㅇ user에 대한 CRUD에 관한 route를 설정하였다.
fun Routing.cityRoute(cityService: CityService){
    route("/cities"){
        get {
            val cities=cityService.getAllCities()
            call.respond(HttpStatusCode.OK,cities)
        }
        post {
            val city=call.receive<City>()
            cityService.addCity(city)?.let {
                call.respond(HttpStatusCode.Created,it)
            } ?: call.respond(HttpStatusCode.BadRequest,"Error!!")
        }
        get("/userinfo"){
            val userInfo=cityService.getAllUsersInfo()
            call.respond(HttpStatusCode.OK,userInfo)
        }
        delete("/{id}") {
            call.parameters["id"]?.toInt()?.let {
                cityService.deleteCity(it)
            } ?: call.respond(HttpStatusCode.BadRequest,"Provide Id!!")
        }
    }
}
ㅇ city에 대한 Route를 설정하였다.
ㅇ get, post, put, delete 요청을 처리할 수 있다.
fun Application.configureRouting(userService: UserService=get(),cityService: CityService=get()) {
    routing {
        userRoute(userService)
        cityRoute(cityService)
    }
}
ㅇ com/example/plugins/Routing.kt에 두 Route를 주입시켜주었다.
ㅁ 서버 기동

ㅇ Gradle > Tasks > application > run으로 애플리케이션을 실행하였다.
ㅁ 테스트 with Postman

curl --location 'http://localhost:8080/cities' \
--header 'Content-Type: application/json' \
--data '{
    "cityName":"peterica"
}'
ㅇ 도시 등록
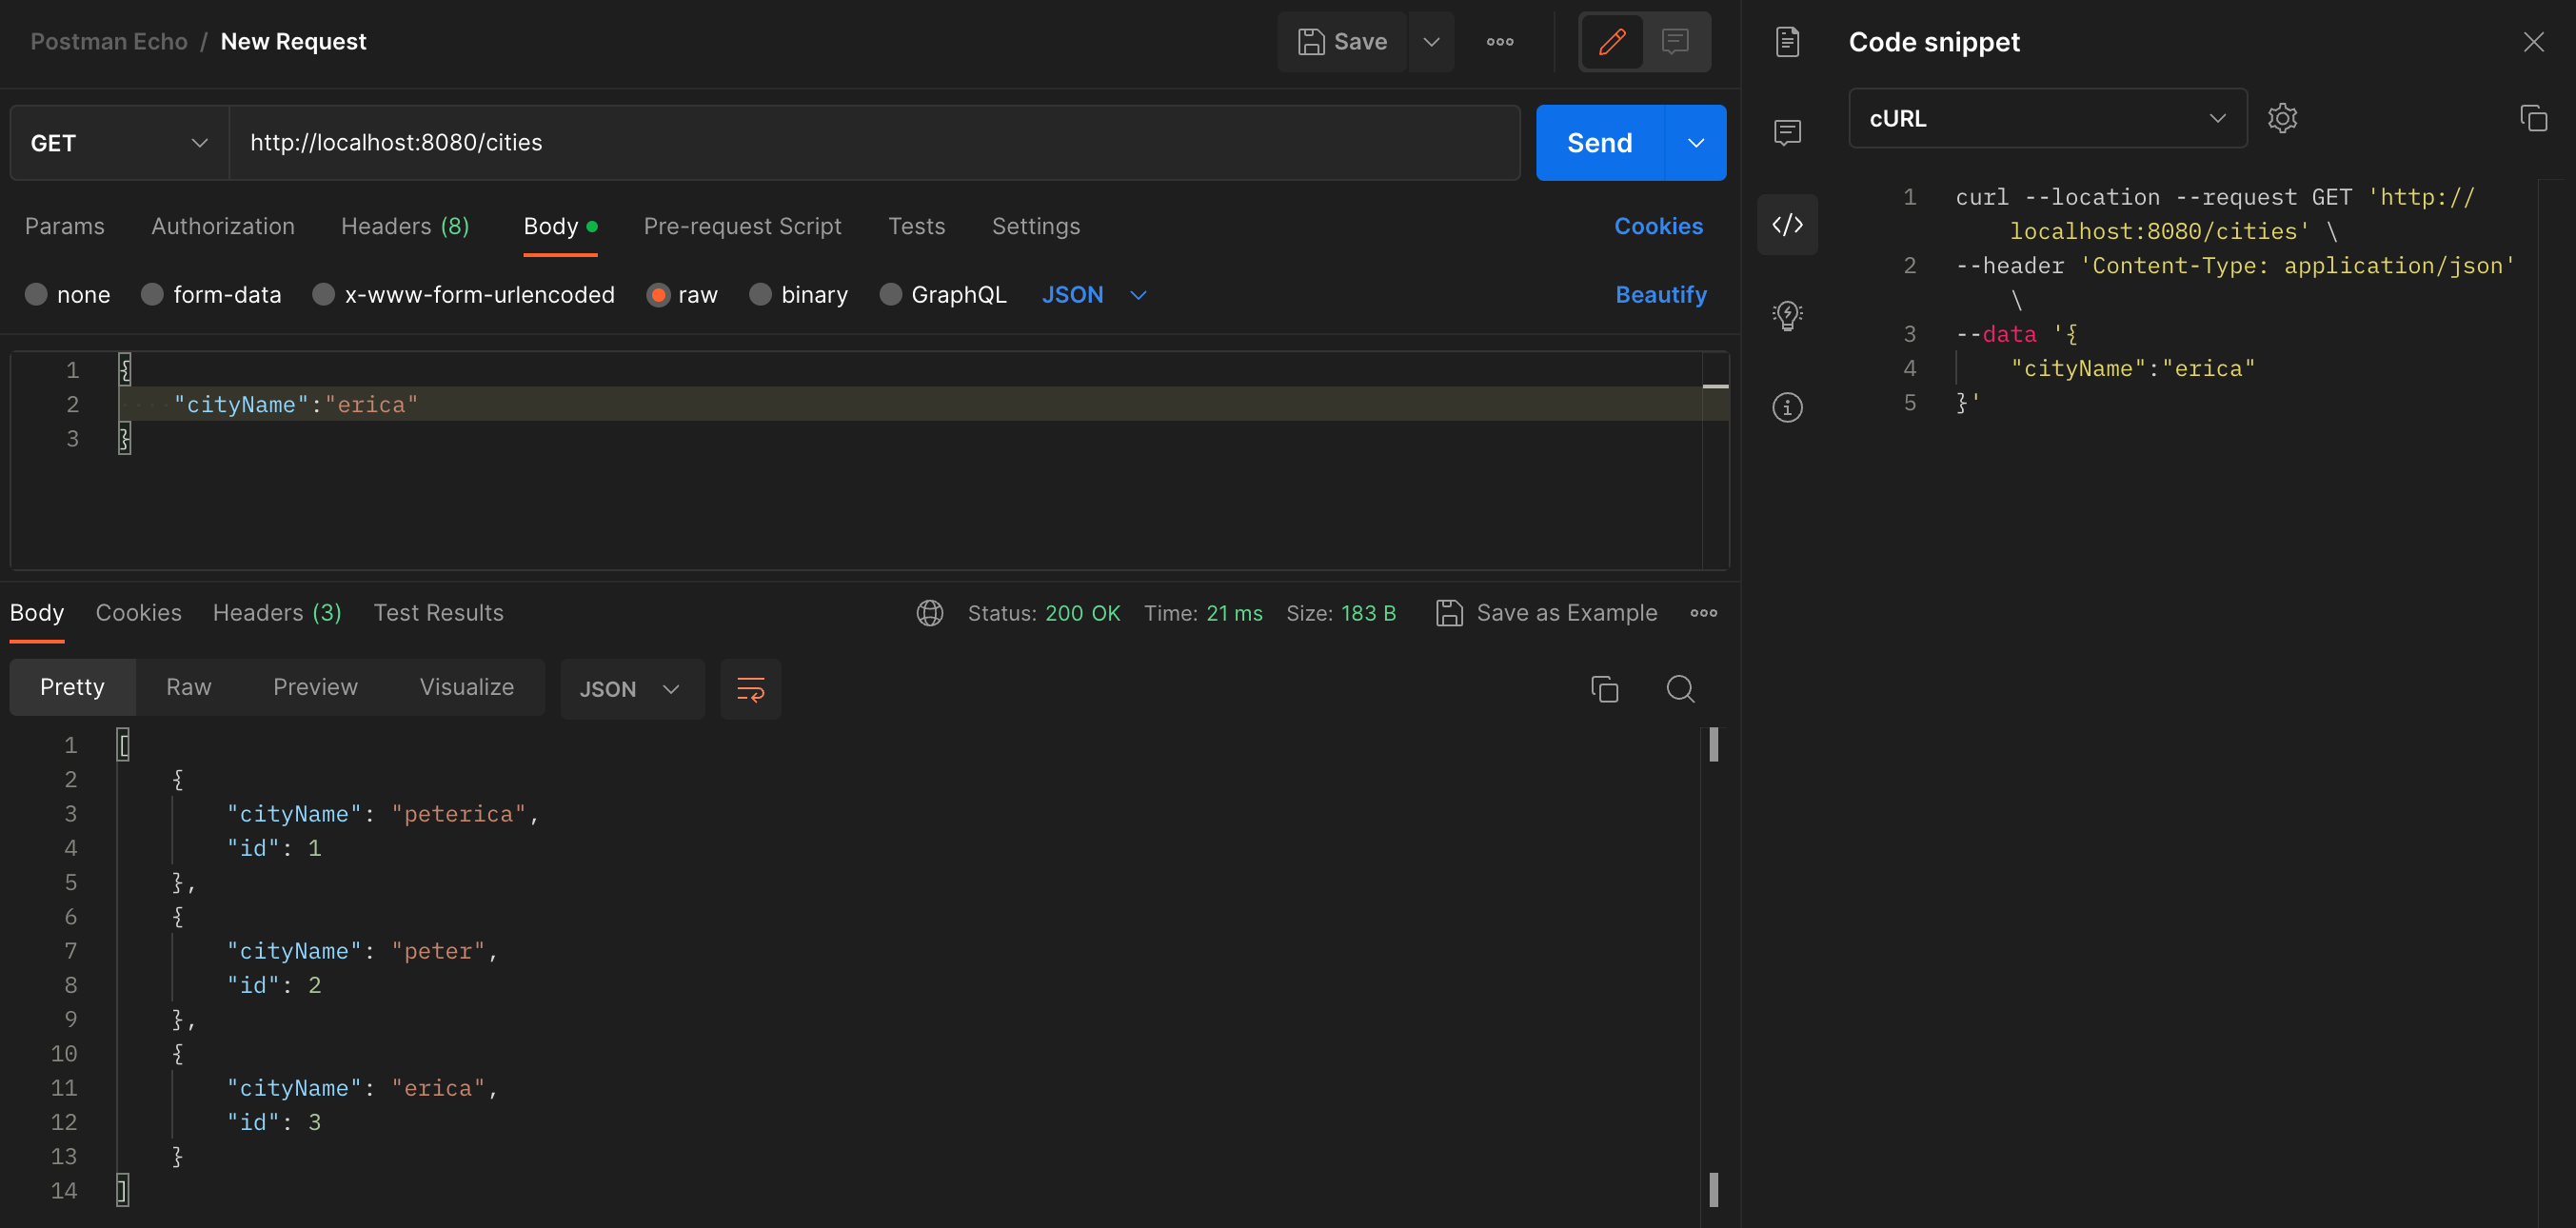
curl --location --request GET 'http://localhost:8080/cities' \
--header 'Content-Type: application/json' \
--data '{
    "cityName":"erica"
}'
ㅇ 도시 목록 조회
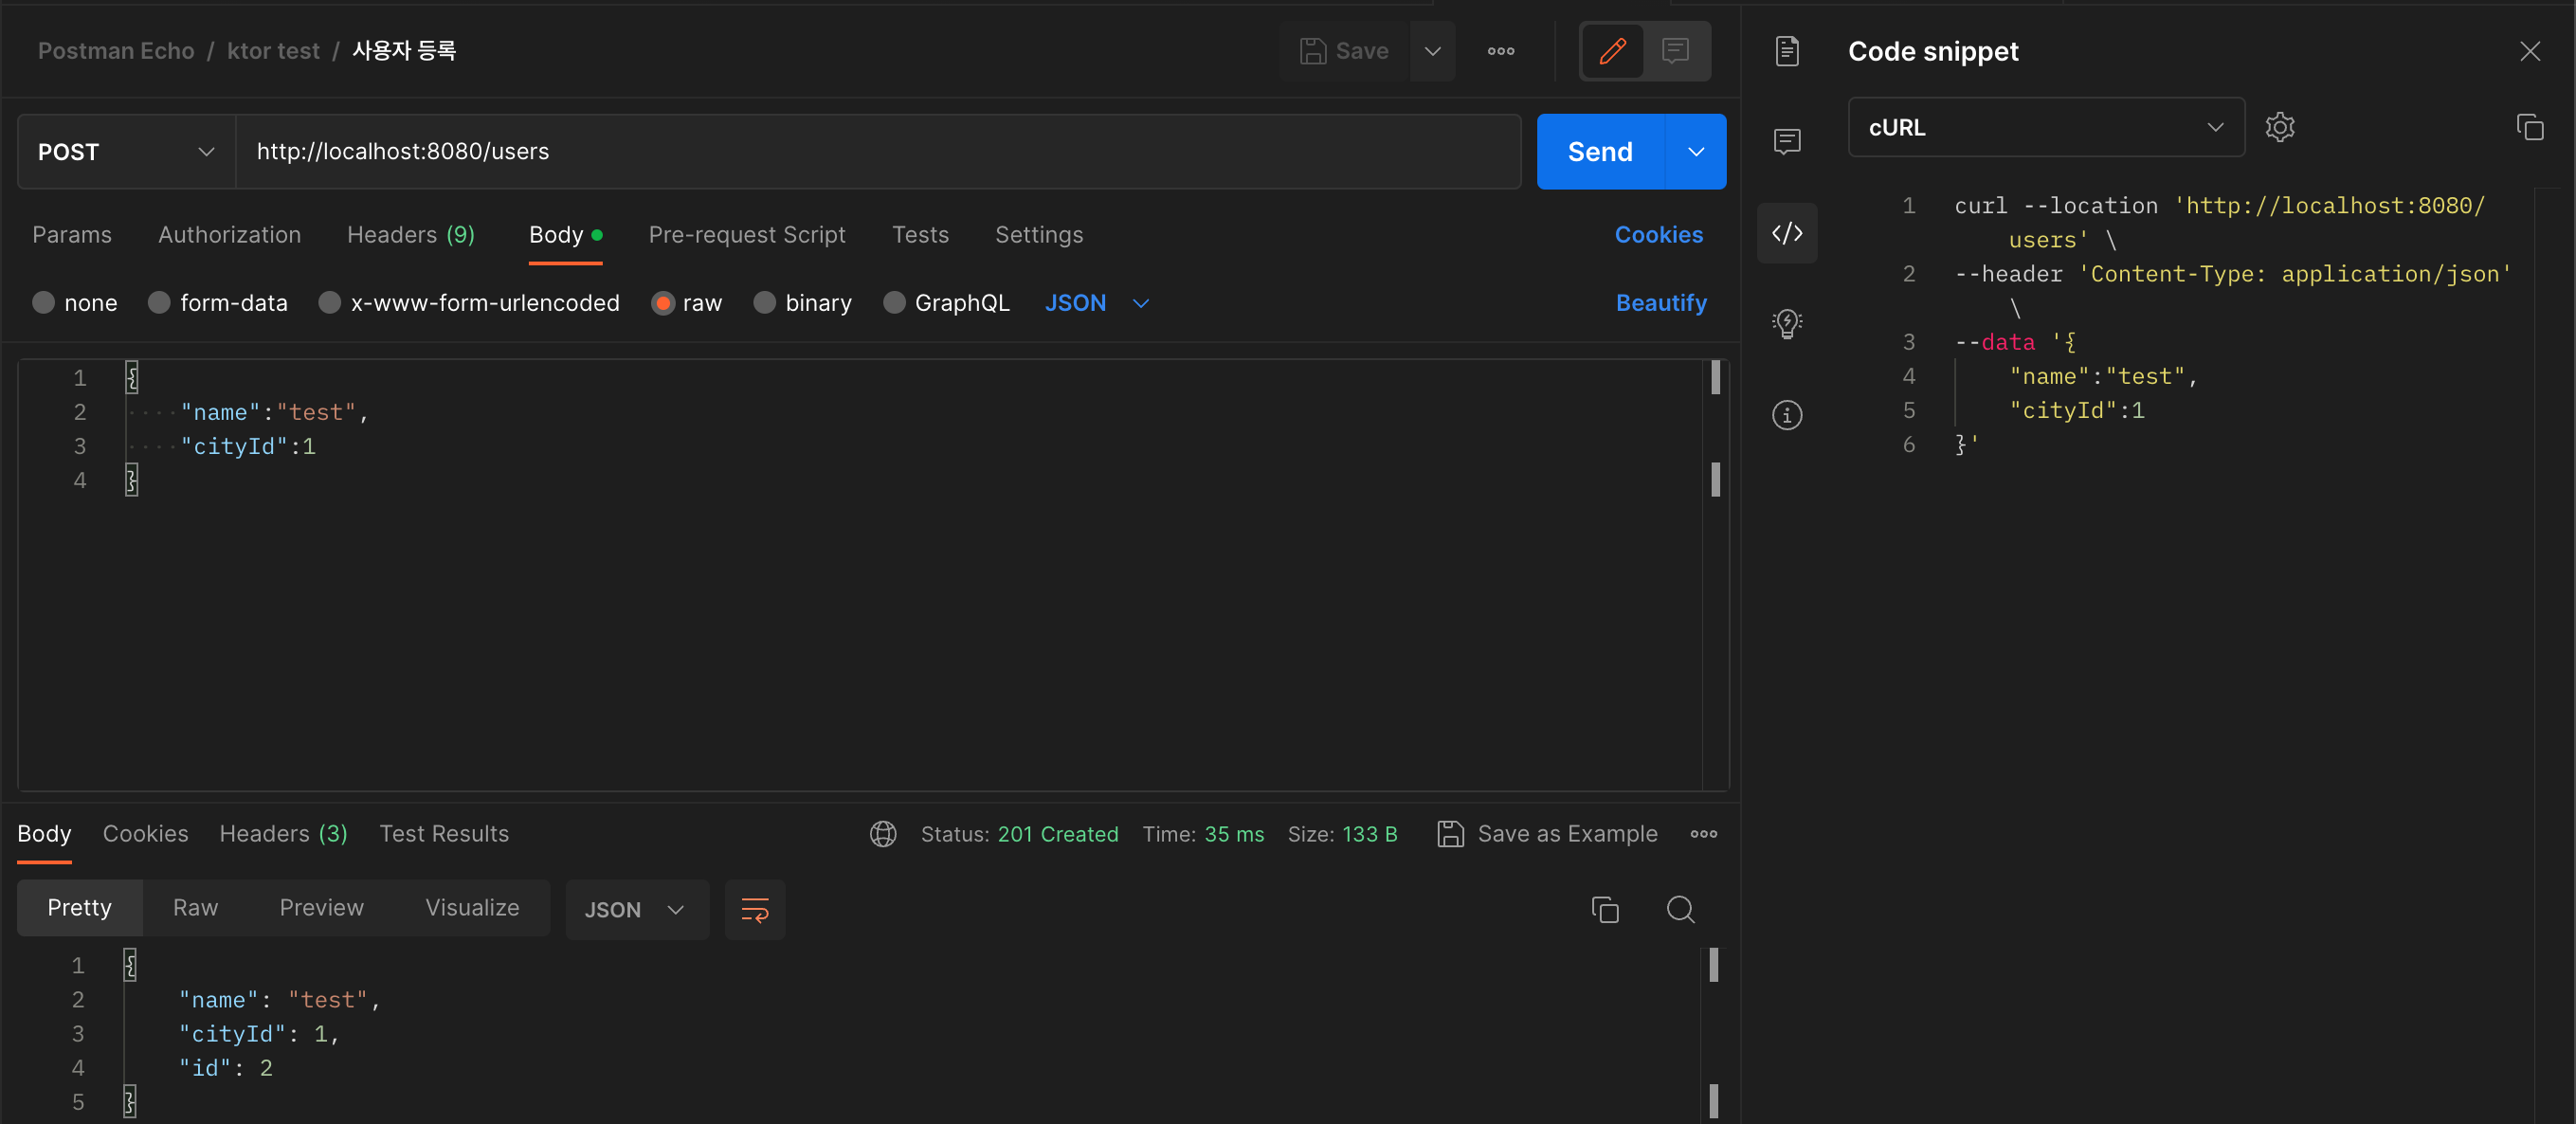
curl --location 'http://localhost:8080/users' \
--header 'Content-Type: application/json' \
--data '{
    "name":"test",
    "cityId":1
}'
ㅇ 사용자 등록
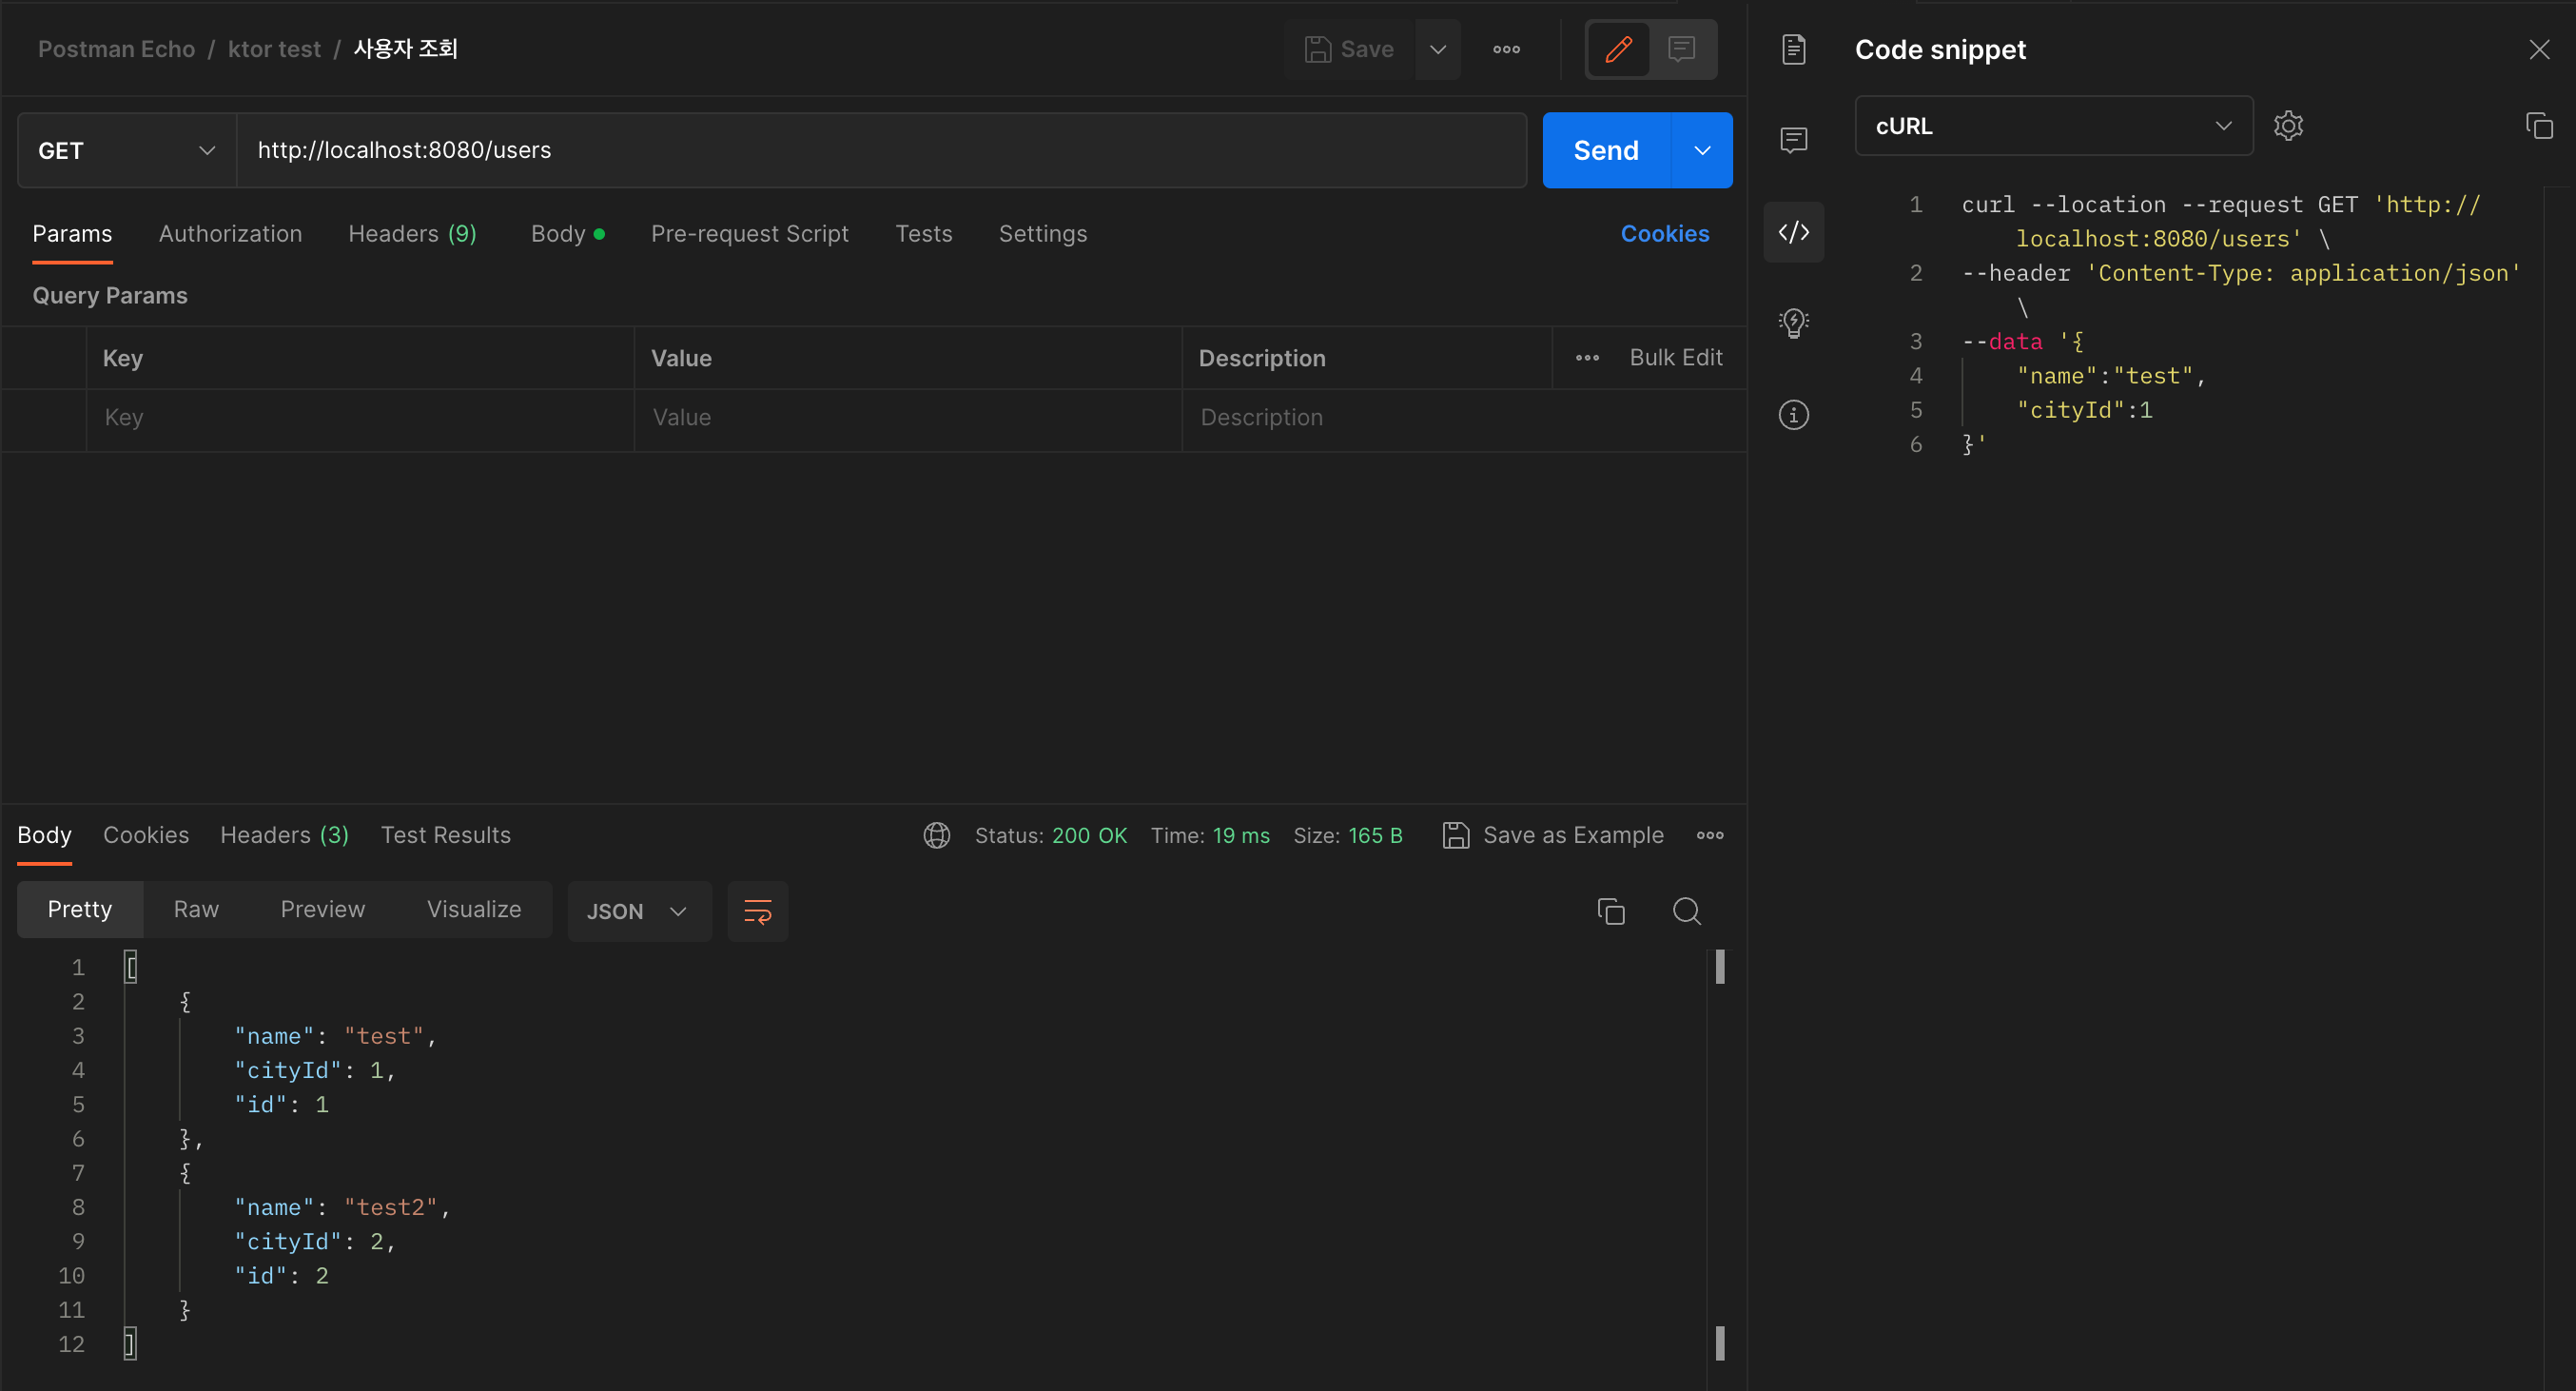
curl --location --request GET 'http://localhost:8080/users' \
--header 'Content-Type: application/json'
ㅇ 사용자 조회

curl --location 'http://localhost:8080/users' \
--header 'Content-Type: application/json'
ㅇ 사용자 조회
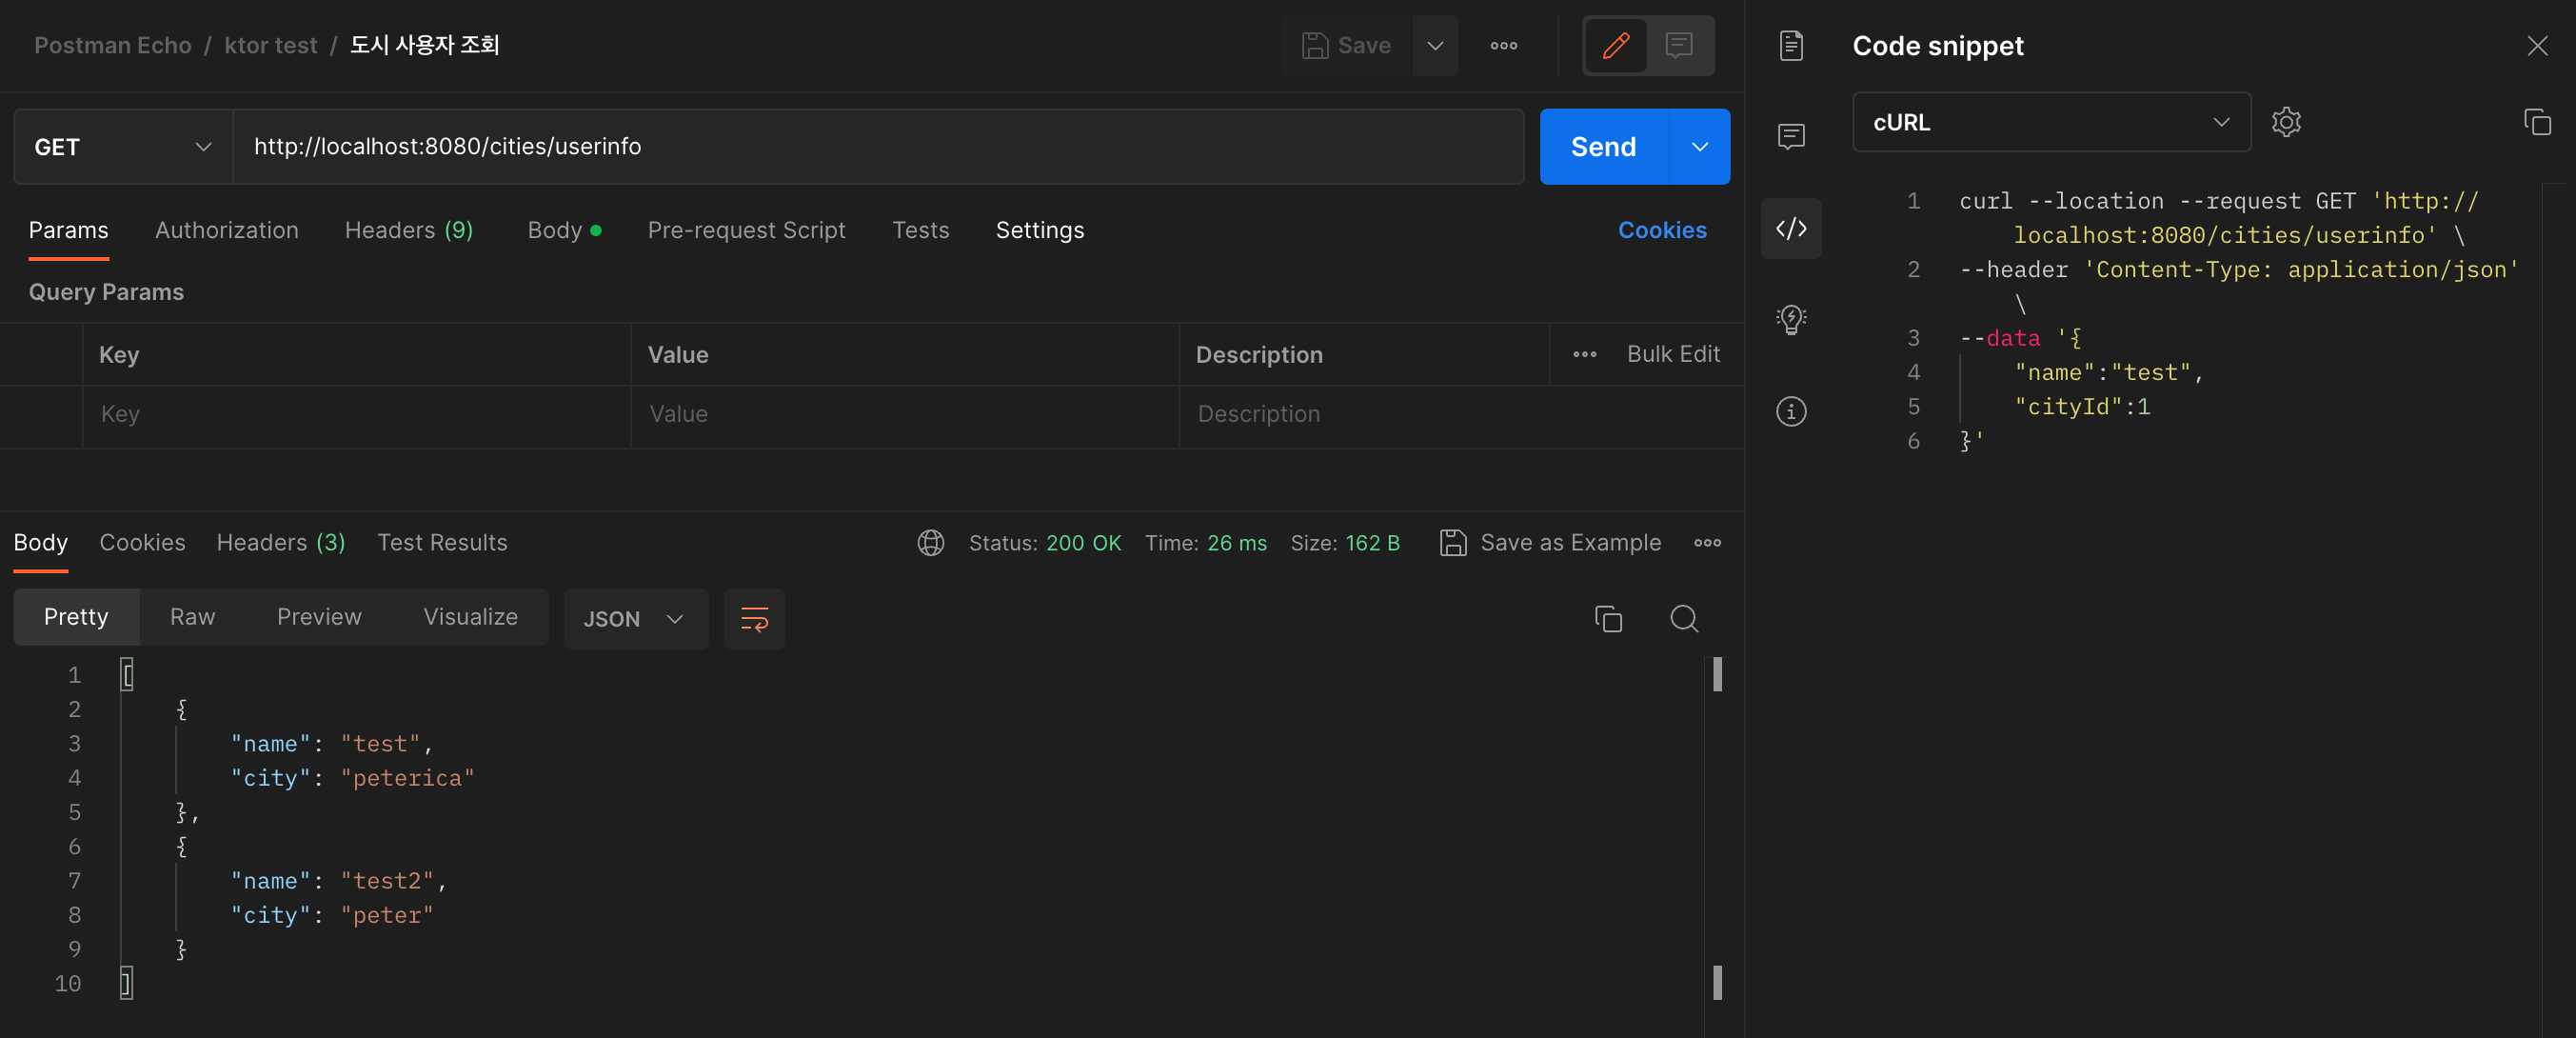
curl --location --request GET 'http://localhost:8080/cities/userinfo' \
--header 'Content-Type: application/json' \
--data '{
    "name":"test",
    "cityId":1
}'
ㅇ 도시 사용자 조회


ㅇ 위에 사용한 API를 도큐먼트 형태로 출력할 수도 있다.
ㅁ 마무리
ㅇ 경량화된 Ktor 애플리케이션으로 MySQL 디비를 연결하여 간단한 데이터 엑세스를 진행해 보았다.
ㅇ 간단하게 데이터를 핸들링하기에는 무리가 없고 간단하게 개발을 진행할 수 있었다.
작업했던 소스는 이곳에 있다.
ㅁ 함께 보면 좋은 사이트
ㅇ [Ktor] Kotlin + Ktor + Ktorm 환경에서 MySQL 연동하기
'Programming > Kotlin' 카테고리의 다른 글
| [Kotlin] Map 다양한 사용법 (1) | 2024.07.09 |
|---|---|
| [Kotlin] 코틀린 MapStruct 사용방법 (0) | 2024.07.08 |
| [Kotlin] ?(물음표)와 !!(느낌표 두개) (0) | 2024.06.28 |
| [Kotlin] Scope Functions (let, with, run, apply, also) 정리 (0) | 2024.06.25 |
| [Kotlin] Ktor 샘플 프로젝트 생성과정, 10분 미만 (0) | 2024.06.24 |


